Intellij Platform SDK API
SDK 中提供了相当多的可编程API,这里只介绍主要的几种,其他的可以查阅文档。
# 旧版生命周期钩子
已经被 Jetbrains SDK 标记为废弃,可能将会在某一时间删除。在当前最新版 intellij IDEA 2020.3 中仍然可以使用
# 应用启动钩子
plugin.xml 注册和java实现
<application-components>
    <component>
        <implementation-class>main.Hook</implementation-class>
    </component>
</application-components>
2
3
4
5
6
package main;

import com.intellij.openapi.components.ApplicationComponent;

public class Hook implements ApplicationComponent
{
    @Override
    public void initComponent()
    {
        // IDEA 应用启动后自动执行的业务代码
        // 该钩子的执行,不关心项目是否打开
    }
}
2
3
4
5
6
7
8
9
10
11
12
13
# 项目启动钩子
plugin.xml 注册和实现
<project-components>
    <component>
        <implementation-class>main.Hook</implementation-class>
    </component>
</project-components>
2
3
4
5
6
package main;

import com.intellij.openapi.components.ProjectComponent;

public class Hook implements ProjectComponent
{
    @Override
    public void initComponent()
    {
        // IDEA 启动后打开任意项目后自动执行的业务代码
        // 必须打开项目,才会执行该钩子
    }
}
2
3
4
5
6
7
8
9
10
11
12
13
# 新版生命周期钩子
在当前最新版 intellij IDEA 2020.3 中已经可以使用
# 应用启动钩子
<extensions defaultExtensionNs="com.intellij">
    <preloadingActivity implementation="main.Hook"/>
</extensions>
2
3
4
package main;

import com.intellij.openapi.application.PreloadingActivity;
import com.intellij.openapi.progress.ProgressIndicator;
import org.jetbrains.annotations.NotNull;

public class Hook extends PreloadingActivity
{
    @Override
    public void preload(@NotNull ProgressIndicator indicator)
    {
        // IDEA 应用启动后自动执行的业务代码
        // 该钩子的执行,不关心项目是否打开
    }
}
2
3
4
5
6
7
8
9
10
11
12
13
14
15
# 项目启动钩子
<extensions defaultExtensionNs="com.intellij">
    <startupActivity implementation="main.Hook"/>
</extensions>
2
3
4
package main;

import com.intellij.openapi.project.Project;
import com.intellij.openapi.startup.StartupActivity;
import org.jetbrains.annotations.NotNull;

public class Hook implements StartupActivity
{
    @Override
    public void runActivity(@NotNull Project project)
    {
        // IDEA 启动后打开任意项目后自动执行的业务代码
        // 必须打开项目,才会执行该钩子
    }
}
2
3
4
5
6
7
8
9
10
11
12
13
14
15
# 项目启动后钩子
未经测试
<extensions defaultExtensionNs="com.intellij">
    <postStartupActivity implementation="main.Hook"/>
</extensions>
2
3
4
package main;

import com.intellij.openapi.project.DumbAware;
import com.intellij.openapi.project.Project;
import org.jetbrains.annotations.NotNull;

public class Hook implements DumbAware
{
    void runActivity(@NotNull Project project)
    {
        // 项目启动完成后执行的代码,无关是否在建立索引
    }
}
2
3
4
5
6
7
8
9
10
11
12
13
# 项目
获取当前项目
ProjectManager.getInstance().getDefaultProject()
获取intellij 示例打开的所有项目
ProjectManager.getInstance().getOpenProjects()
# 动作
在选项卡中注册属于自己的动作功能,例如在 Tools 中注册一个 GetNowTime 项目,来获取当前时间。
<actions>
    <!-- id    该动作的唯一编号,使用类名即可
         class 动作的Java实现
         text  动作在菜单中显示的文字
         description  动作描述,非必须 -->
    <action id="main.ActionExample" class="org.println.helper.actions.ActionExample" text="GetNowTime"
            description="获取当前时间">
        <!-- 该动作在何处,此处添加到 Tools 菜单中。anchor 是添加的位置,first 为最前 -->
        <add-to-group group-id="ToolsMenu" anchor="first"/>
        <!-- 绑定快捷键,keymap 为绑定的快捷键组,first-keystroke 首选快捷键 second-keystroke 为备选快捷键-->
        <keyboard-shortcut keymap="$default" first-keystroke="meta G" second-keystroke="shift meta G"/>
    </action>
</actions>
2
3
4
5
6
7
8
9
10
11
12
13
14
package main;

import com.intellij.openapi.actionSystem.AnAction;
import com.intellij.openapi.actionSystem.AnActionEvent;
import org.jetbrains.annotations.NotNull;

public class ActionExample extends AnAction
{
    @Override
    public void actionPerformed(@NotNull AnActionEvent e)
    {

    }
}
2
3
4
5
6
7
8
9
10
11
12
13
14
自动生成 XML 配置
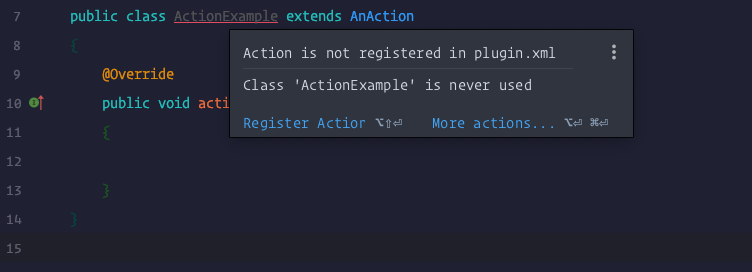
新建一个java类并继承 com.intellij.openapi.actionSystem.AnAction,实现 actionPerformed 方法。
将鼠标放在类名上,稍等片刻就会出现提示,直接点击 Register Action 即可。
然后就会出现类似如下的界面,根据需求选择即可。
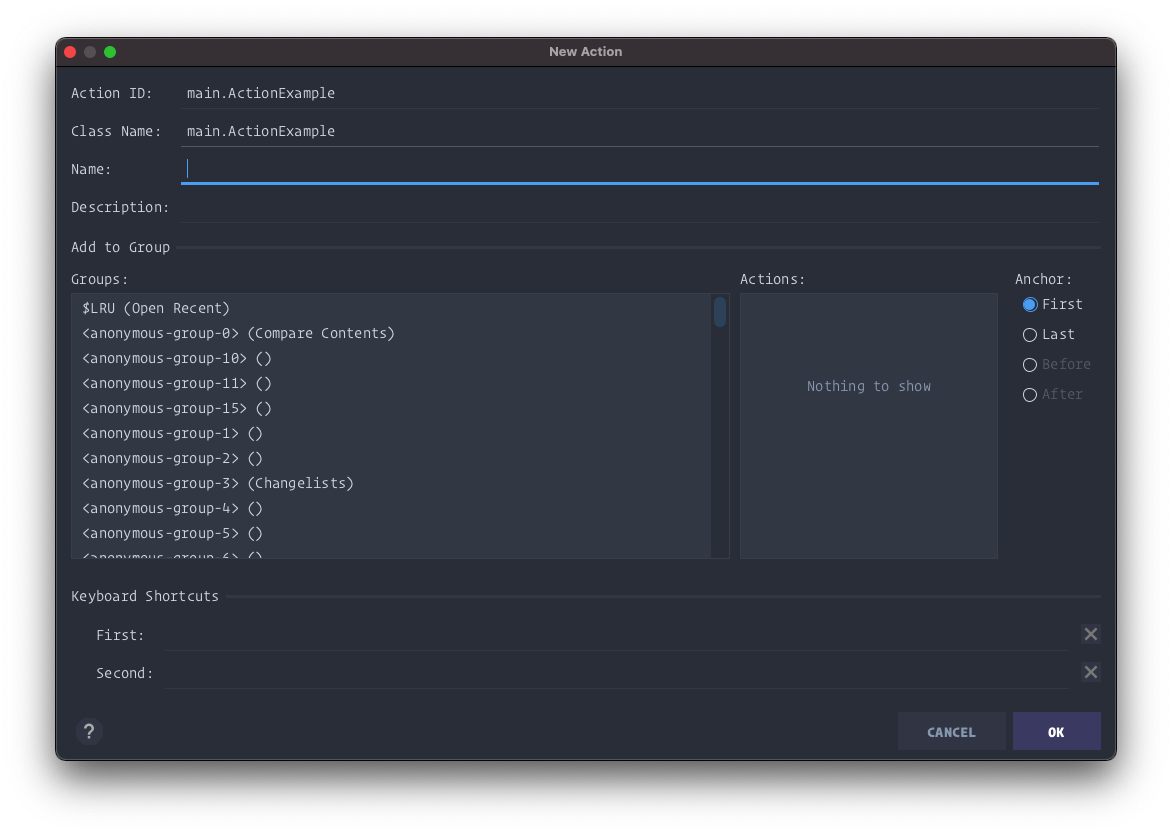
最后按Ok,就会自动生成XML配置。
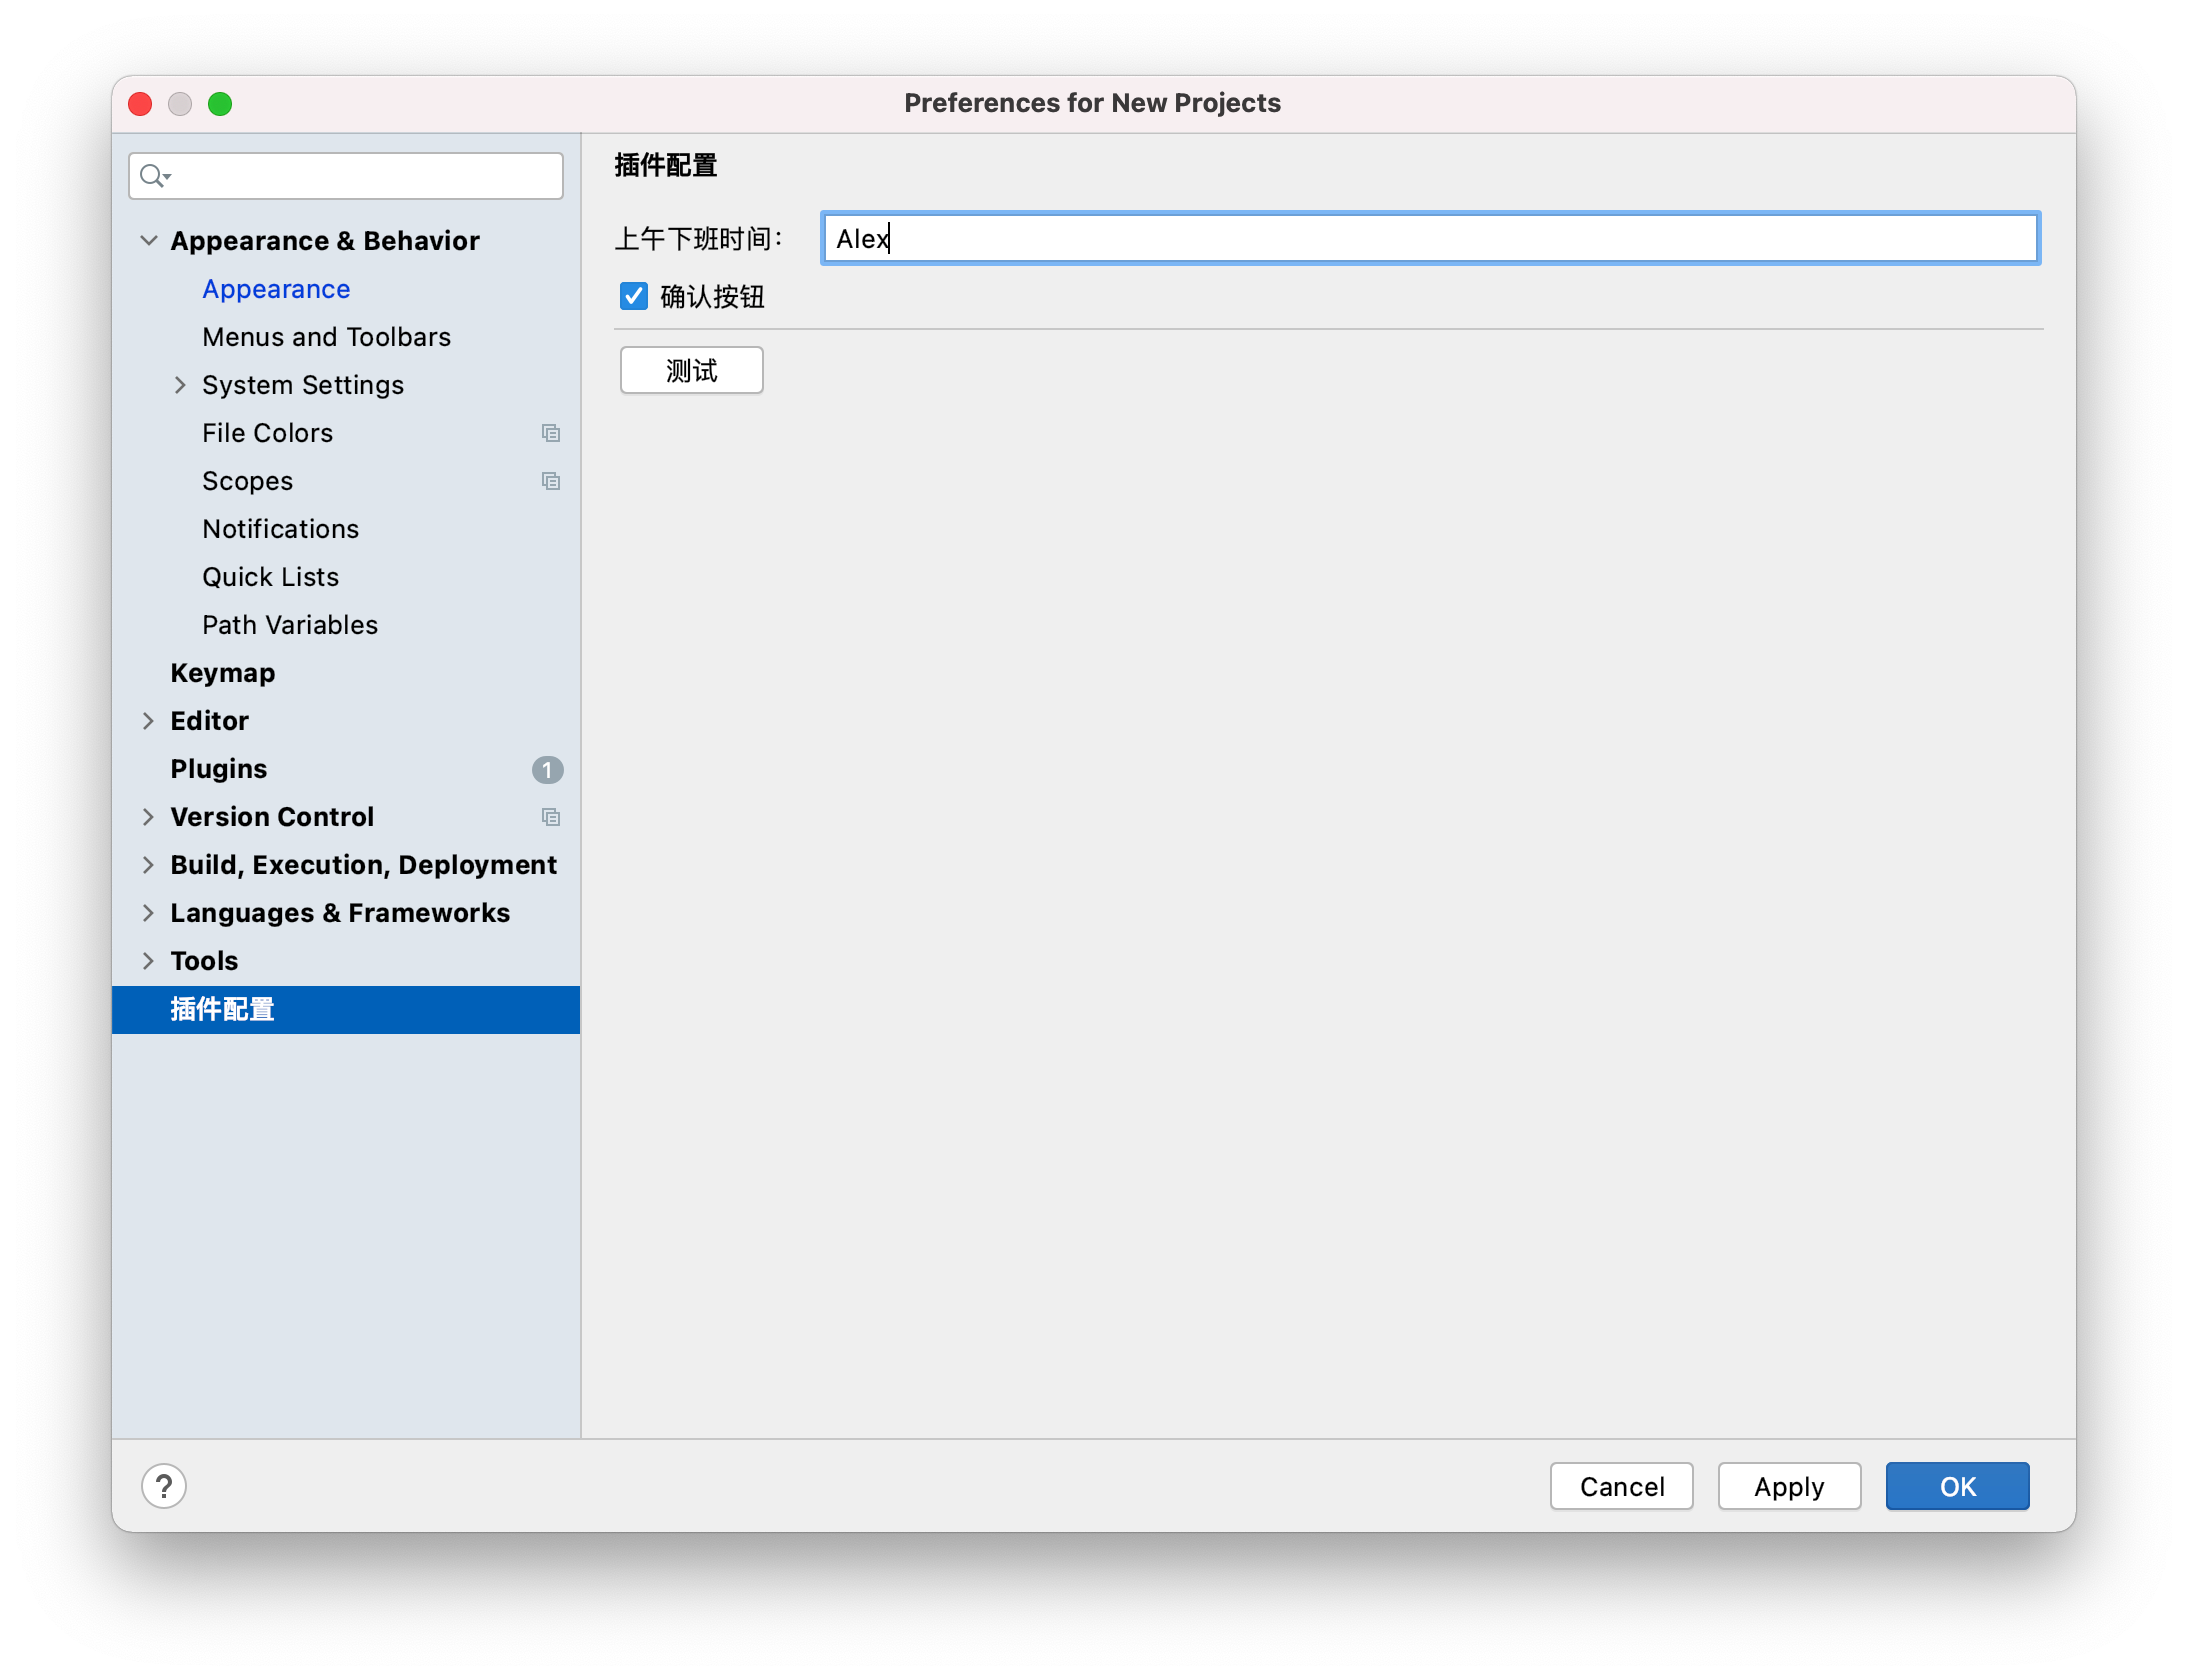
# 设置
持久化配置信息到 IDEA 设置中,使用户可配置,插件可读取。
# 基本配置
SettingsPanel 绘制配置的界面
package settings;
import com.intellij.openapi.ui.Messages;
import com.intellij.ui.components.JBCheckBox;
import com.intellij.ui.components.JBLabel;
import com.intellij.ui.components.JBTextField;
import com.intellij.util.ui.FormBuilder;
import org.jetbrains.annotations.NotNull;
import javax.swing.*;
public class SettingsPanel
{
private final JPanel mainPanel;
private final JBTextField username = new JBTextField();
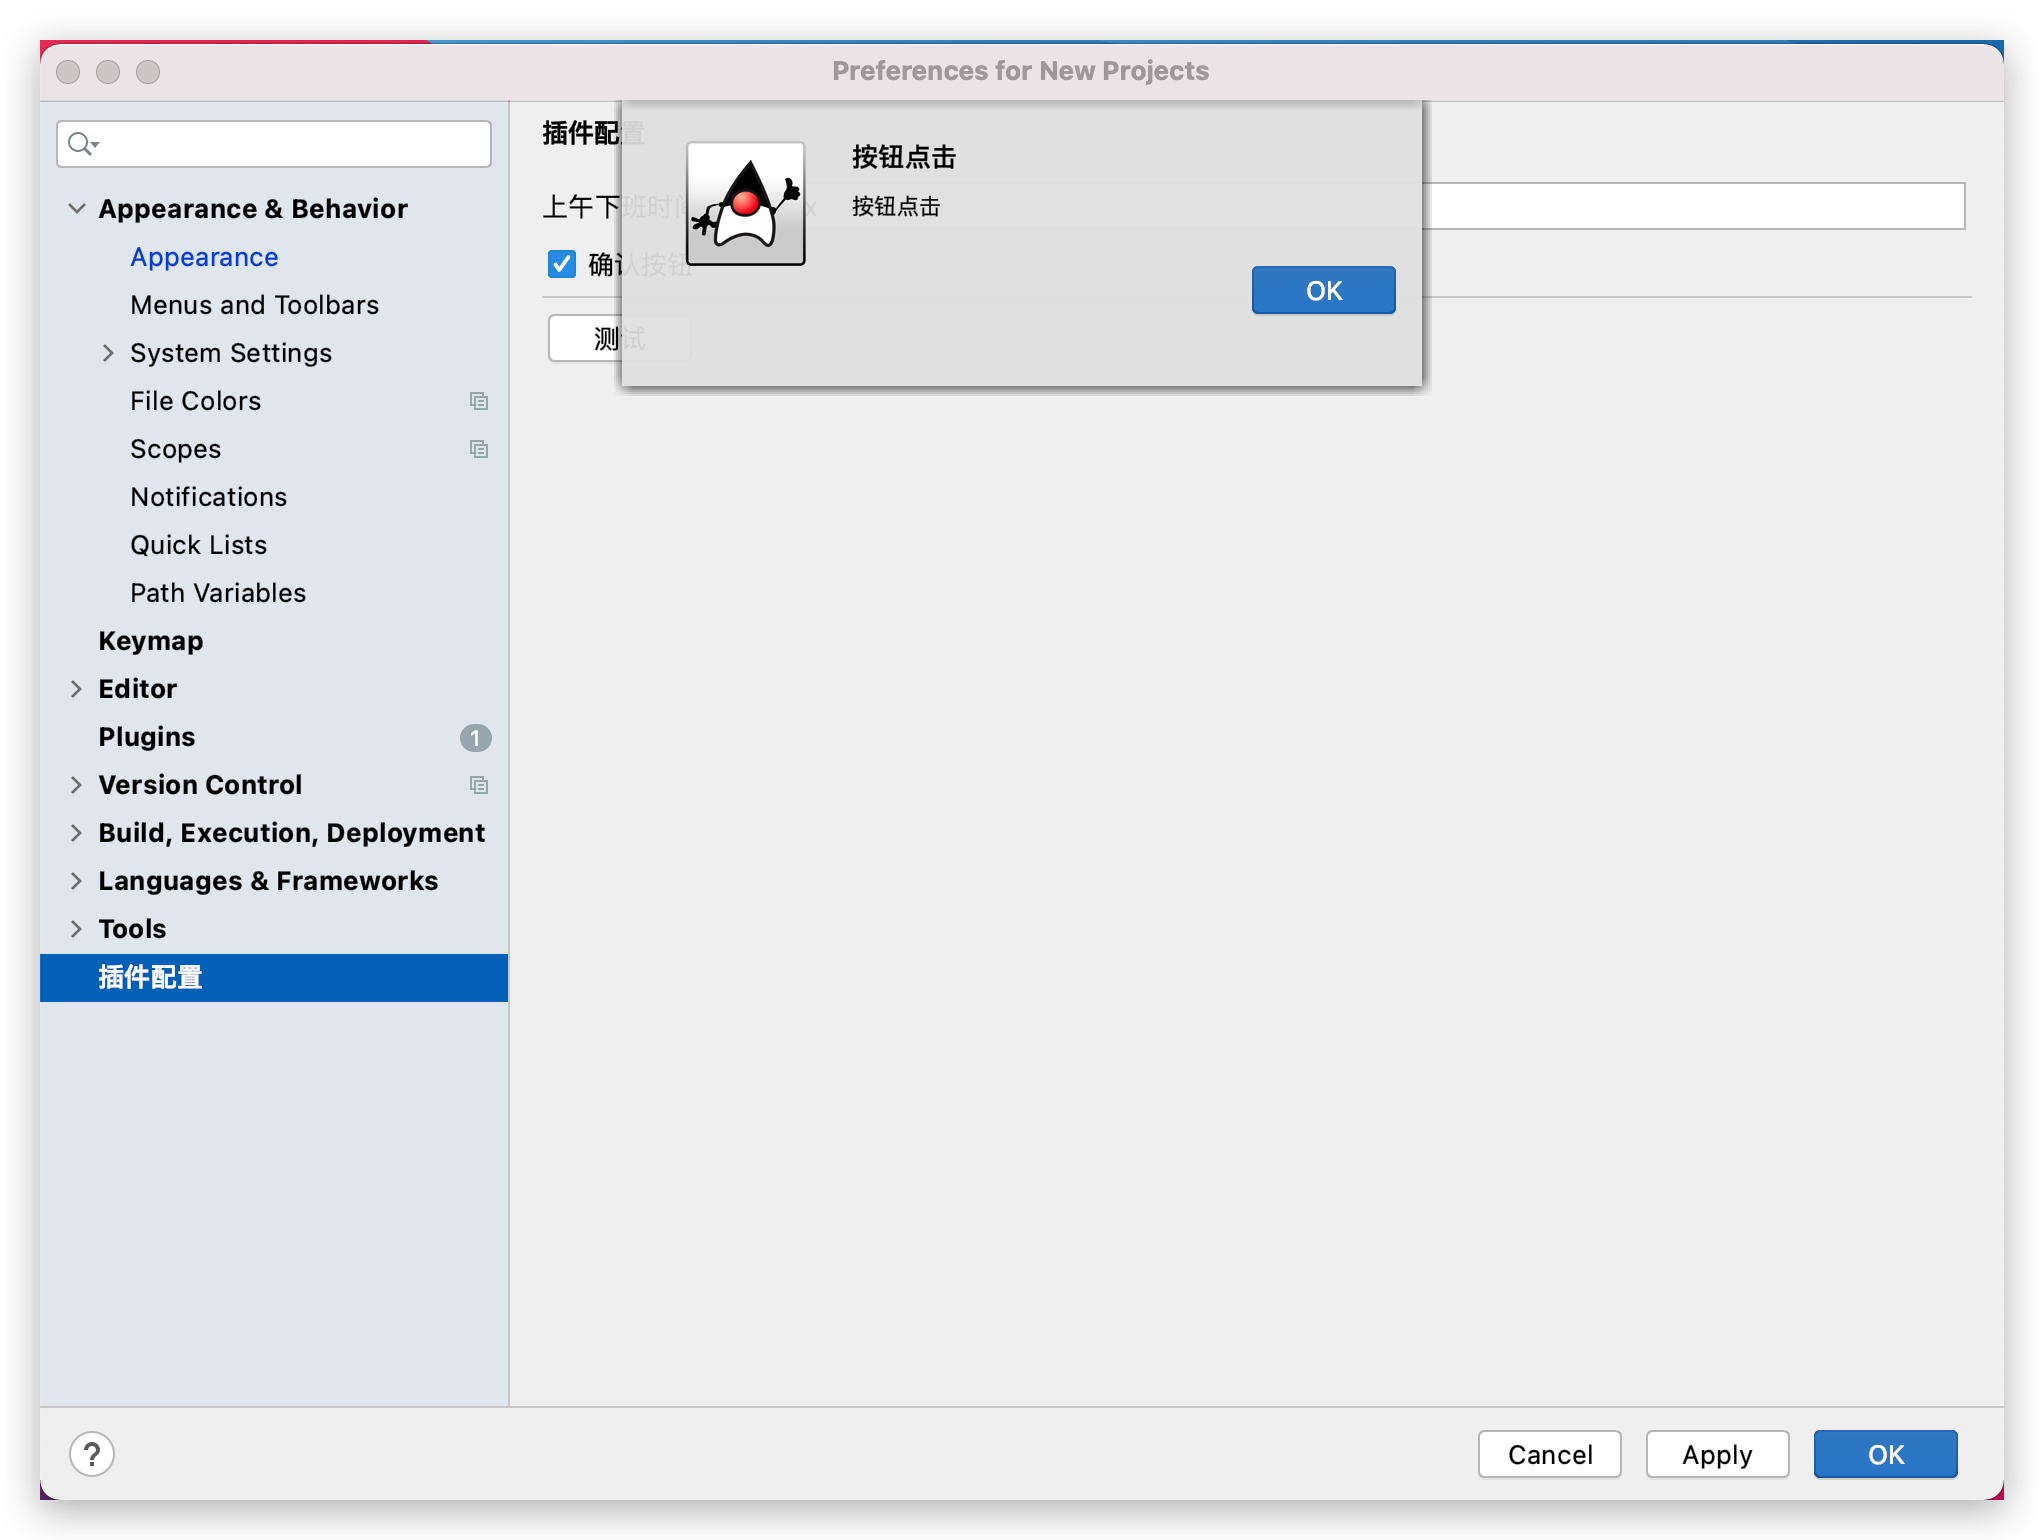
private final JButton button = new JButton("测试");
private final JBCheckBox checkBox = new JBCheckBox("确认按钮");
// 初始化配置界面
public SettingsPanel()
{
// 按钮事件
button.addActionListener(e -> {
Messages.showInfoMessage("按钮点击", "按钮点击");
});
// 绘制界面
mainPanel = FormBuilder
.createFormBuilder()
// 组件的注释,类似:用户名: 输入框
.addLabeledComponent(new JBLabel("用户名:"), username, 1, false)
// 直接增加组件,无需注释
.addComponent(checkBox)
// 增加一个分割线
.addSeparator()
// 增加组件
.addComponent(button)
// 垂直填充到一个 JPanel中
.addComponentFillVertically(new JPanel(), 0)
.getPanel();
}
public JPanel getMainPanel()
{
return mainPanel;
}
// 获取组件
public JBTextField getUsernamePanel()
{
return username;
}
// 获取组件的值
@NotNull
public String getUsername()
{
return username.getText();
}
// 设置组件的值
public void setUsername(@NotNull String value)
{
this.username.setText(value);
}
// 获取复选框是否被选中
@NotNull
public boolean getCheckBox()
{
return checkBox.isSelected();
}
// 设置复选框的选中状态
public void setCheckBox(boolean IsDualWeekValue)
{
checkBox.setSelected(IsDualWeekValue);
}
}
2
3
4
5
6
7
8
9
10
11
12
13
14
15
16
17
18
19
20
21
22
23
24
25
26
27
28
29
30
31
32
33
34
35
36
37
38
39
40
41
42
43
44
45
46
47
48
49
50
51
52
53
54
55
56
57
58
59
60
61
62
63
64
65
66
67
68
69
70
71
72
73
74
75
76
77
78
79
SettingsState 存储配置的值
package settings;

import com.intellij.openapi.components.PersistentStateComponent;
import com.intellij.openapi.components.ServiceManager;
import com.intellij.openapi.components.State;
import com.intellij.openapi.components.Storage;
import com.intellij.util.xmlb.XmlSerializerUtil;
import org.jetbrains.annotations.NotNull;
import org.jetbrains.annotations.Nullable;

// 该配置的唯一ID
@State(name = "SettingsState", storages = {
    // 该配置存储的文件名
    // intellij 直接使用xml文件来存储配置,删除文件则清空配置。
    @Storage("SettingsState.xml")
})
public class SettingsState implements PersistentStateComponent<SettingsState>
{
    // 配置的默认值
    public String  username = "Alex";
    public Boolean checkBox = true;

    // 读取当前的配置
    public static SettingsState getInstance()
    {
        return ServiceManager.getService(SettingsState.class);
    }

    // 获取当前配置
    @Nullable
    @Override
    public SettingsState getState()
    {
        return this;
    }

    // 保存配置
    @Override
    public void loadState(@NotNull SettingsState state)
    {
        XmlSerializerUtil.copyBean(state, this);
    }
}
2
3
4
5
6
7
8
9
10
11
12
13
14
15
16
17
18
19
20
21
22
23
24
25
26
27
28
29
30
31
32
33
34
35
36
37
38
39
40
41
42
43
业务操作,对配置进行增删改查
package setttings;

import com.intellij.openapi.options.Configurable;
import org.jetbrains.annotations.Nls;
import org.jetbrains.annotations.Nullable;

import javax.swing.*;

public class SettingsConfigurable implements Configurable
{
    private SettingsPanel panel;

    // 插件在配置中的显示名称
    @Nls(capitalization = Nls.Capitalization.Title)
    @Override
    public String getDisplayName()
    {
        return "插件配置";
    }

    // 默认聚焦的组件
    @Override
    public JComponent getPreferredFocusedComponent()
    {
        return panel.getUsernamePanel();
    }

    // 初始化配置
    @Nullable
    @Override
    public JComponent createComponent()
    {
        panel = new SettingsPanel();
        return panel.getMainPanel();
    }

    // 当前配置是否和存储的配置不同
    @Override
    public boolean isModified()
    {
        SettingsState settings = SettingsState.getInstance();
        return !panel.getUsername().equals(settings.username) || !panel.getCheckBox() == settings.checkBox;
    }

    // 存储配置
    @Override
    public void apply()
    {
        SettingsState settings = SettingsState.getInstance();
        settings.username = panel.getUsername();
        settings.checkBox = panel.getCheckBox();
    }

    // 重置为当前存储的配置,即上次保存
    @Override
    public void reset()
    {
        SettingsState settings = SettingsState.getInstance();
        panel.setUsername(settings.username);
        panel.setCheckBox(settings.checkBox);
    }

    // 销毁资源
    @Override
    public void disposeUIResources()
    {
        panel = null;
    }
}
2
3
4
5
6
7
8
9
10
11
12
13
14
15
16
17
18
19
20
21
22
23
24
25
26
27
28
29
30
31
32
33
34
35
36
37
38
39
40
41
42
43
44
45
46
47
48
49
50
51
52
53
54
55
56
57
58
59
60
61
62
63
64
65
66
67
68
69
# 注册配置
Panel 直接在代码中调用,无需注册
<extensions defaultExtensionNs="com.intellij">
    <applicationConfigurable instance="settings.SettingsConfigurable"/>
    <applicationService serviceImplementation="settings.SettingsState"/>
</extensions>
2
3
4
5
# 效果图
# 获取配置
SettingsState settings = SettingsState.getInstance();
// 使用配置
System.out.printf("当前用户名:%s" , settings.username);
System.out.printf("当前复选框状态:%b" , settings.checkBox);
2
3
4
# 编程更新配置
直接在程序中更新状态,不通过GUI
// 获取当前配置
SettingsState settings = SettingsState.getInstance();
// 更新配置的值
settings.username = "Alex 123456";
// 保存配置
SettingsState.getInstance().loadState(settings);
2
3
4
5
6
# 生成的 SettingsState.xml
该文件相当于数据库,删除或修改该文件,将会直接影响插件存储的配置信息。
文件位于 build/idea-sandbox/config/options/SettingsState.xml
<application>
    <component name="SettingsState">
        <option name="username" value="Alex"/>
        <option name="checkBox" value="true"/>
    </component>
</application>
2
3
4
5
6
7
# 通知
创建各种形式的通知来提醒用户,并保存通知内容到 EventLog 中。
该API无需注册,直接使用即可
package notify;

import com.intellij.notification.NotificationDisplayType;
import com.intellij.notification.NotificationGroup;
import com.intellij.notification.NotificationType;
import com.intellij.openapi.project.Project;
import org.jetbrains.annotations.Nullable;

public class NotifyGroup
{
    // 初始化通知类,NotificationGroup 为该通知的唯一ID,如果同时的多条通知在同一个Group中,IDEA则会自动折叠。
    // 如果不想折叠,可以使用随机的 Group ID
    private static final NotificationGroup NOTIFICATION_GROUP = new NotificationGroup(
        "NotificationGroup", NotificationDisplayType.BALLOON, true
    );

    // 多种级别的唯一不同,就是通知左上角的小图标
    public static void error(@Nullable Project project, String content)
    {
           // 错误级别的通知
        NOTIFICATION_GROUP.createNotification("标题", content, NotificationType.ERROR, null)
                          .notify(project);
    }

    public static void info(@Nullable Project project, String content)
    {
        // 消息级别的通知
        NOTIFICATION_GROUP.createNotification("标题", content, NotificationType.INFORMATION, null)
                          .notify(project);
    }

    public static void warning(@Nullable Project project, String content)
    {
        // 警告级别的通知
        NOTIFICATION_GROUP.createNotification("标题", content, NotificationType.WARNING, null)
                          .notify(project);
    }
}
2
3
4
5
6
7
8
9
10
11
12
13
14
15
16
17
18
19
20
21
22
23
24
25
26
27
28
29
30
31
32
33
34
35
36
37
38
39
# 效果图
单条通知

多条折叠

EventLog 效果

# 图标
# 插件图标
直接在plugin.xml的同级目录放置svg图片即可:/src/main/resources/META-INF/pluginIcon.svg,效果如下

# 动作图标
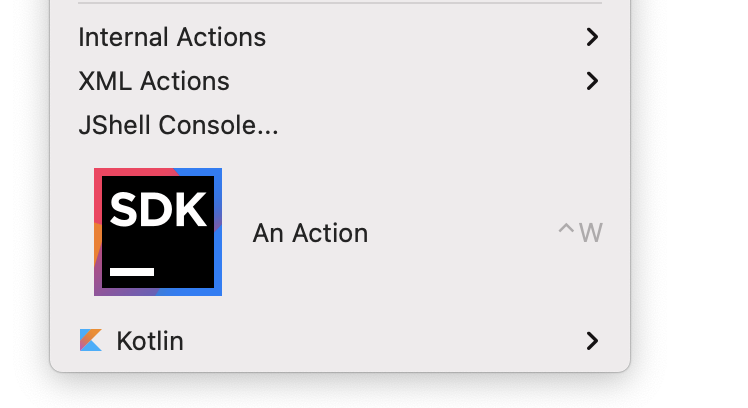
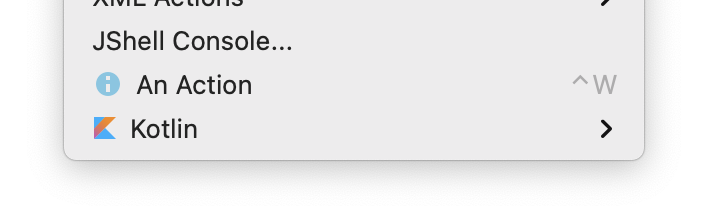
我们可以给自定义的动作 An Action 前面加一个小小的叹号,就像 Kotlin 前面的这个。
注册图标只需要在Action的构造方法中,调用置顶的 super() 即可,第三个参数就是图标。
使用自带的图标
默认图标位于:~/.gradle/*/com.jetbrains.intellij.idea/*/icons.jar ,可以在预览之后使用 AllIcons.目录名.图标名 调用图标
package actions;

import com.intellij.openapi.actionSystem.AnAction;

public class Action extends AnAction
{
    public Action()
    {
        // com.intellij.icons.AllIcons 里面包含了intellij自带的各种图标,可以直接使用。例如我们选择的这个蓝色的叹号
        super("An Action", "Descption", AllIcons.General.Information);
    }
}
2
3
4
5
6
7
8
9
10
11
12
使用自定义图片作为图标:
新建图标类,属性为图标名字
使用相对路径对图标进行定位,相对路径基于当前项目的 resource 目录。
即 /icons/actionicon.svg 对应的实际位置为:project_path/src/main/resources/icons/actionicon.svg
package icons;

import com.intellij.openapi.util.IconLoader;
import javax.swing.*;

public class ActionIcon
{
    // 属性可以有任意个,且可以重复。也不一定是属性,只要返回值为 Icon,使用方法也可以
    public static final Icon actionIcon = IconLoader.getIcon("/icons/actionicon.svg");
}
2
3
4
5
6
7
8
9
10
调用自定义图标
import holiday.calculator.tools.ActionIcon;
public class Action extends AnAction
{
    public Action()
    {
        super("An Action", "Descption", ActionIcon.actionIcon);
    }
}
2
3
4
5
6
7
8
值得注意的是:该svg图标的宽高需要为 12x12 或 16x16,否则就会出现这样的奇怪效果