C++
# 程序的基本结构
#include <iostream>

int main(const int argc, char* argv[])
{
    std::cout << "Hello World" << std::endl << "argc: " << argc  << std::endl << "argv: " << *argv << std::endl;

    return 0;
}
2
3
4
5
6
7
8
# 使用 g++ 运行程序
g++ main.cpp -o main && ./main
# 使用 cmake 运行程序
CMakeLists.txt
cmake_minimum_required(VERSION 3.29)
project(main)

set(CMAKE_CXX_STANDARD 17)

include_directories(include)
add_executable(${PROJECT_NAME} main.cpp)
2
3
4
5
6
7
生成 Makefile
mkdir build && cd build
cmake ..
2
编译和执行
make && ./main
# 变量
type name = value;
auto name = value;
2
# 调试
编译时设置 CMAKE_BUILD_TYPE 环境变量使编译产物携带可调式信息
cmake -DCMAKE_BUILD_TYPE=Debug
部分项目环境变量无效,需要显式的在 CMakeLists.text 中设置该属性
SET(CMAKE_BUILD_TYPE "Debug")
# Core Dump
# 常量
- 宏常量
#define Name 1.23
- const 常量
const int argc = 100;
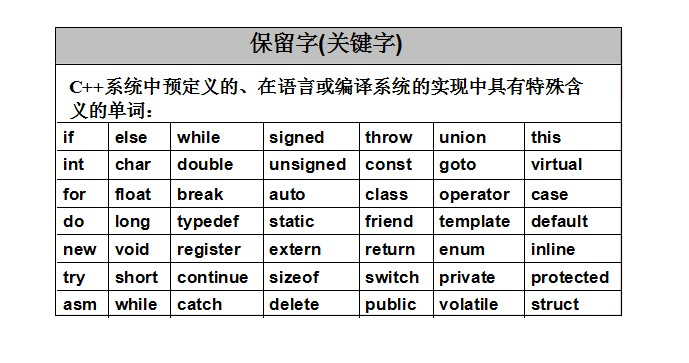
# 关键字
# 查看数据类型的内存大小
运行结果:8, 4,分别代表8字节和4字节
int l1 = 100;
std::cout << sizeof(long) << ", " << sizeof(l1) << std::endl;
2
# 字符和字符串
字符
char s = 'a';
C 风格字符串
char* s1 = "Hello";
char s1[] = "Hello";
2
C++ 风格字符串
string s1 = "Hello";
# 程序三个结构,顺序、分支、循环
程序顺序执行,分支循环是经典结构,不多赘述。
if
if (condition) {
	//
} else if (condition) {
	//
} else {
	//
}
2
3
4
5
6
7
switch
switch (a) {
case 1:
	//
default:
	//
}
2
3
4
5
6
for
for (int i = 0; i <= 100; i ++) {
	//
}
2
3
while
while (condition) {
	//
}
2
3
do while
do {
	 //
} while (condition);
2
3
# 内存管理
本节可以参考后面的“内存布局”节以加深理解
不同于C语言中使用 malloc() 和 free() 管理内存,C++ 增加了两个内存相关的关键字 new / delete。使用 new 关键字将会获得内存首地址的指针
#include <iostream>
#include <string>

int main(int argc, char** argv)
{
    int* a = new int(1);
    std::string* b = new std::string("Hello World");
    int* l = new int[] {
        185,
        18,
        185,
    };

    std::cout << *a << std::endl;
    std::cout << *b << std::endl;
    std::cout << *l << std::endl;

    delete a;
    delete b;
    delete[] l;

    std::cout << *a << std::endl;
    std::cout << *b << std::endl;
    std::cout << *l << std::endl;

    return 0;
}
2
3
4
5
6
7
8
9
10
11
12
13
14
15
16
17
18
19
20
21
22
23
24
25
26
27
运行结果
1
Hello World
185
-321764256

-321764240
2
3
4
5
6
# std::nothrow
是空类型 std::nothrow_t 的常量,用于区分抛出与不抛出分配函数的重载。
简而言之就是使用 std::nothrow 修饰 new 关键字之后,在内存无法分配的时候不抛出 std::bad_alloc 异常,而是返回 nullptr
- 正常分配
#include <iostream>
#define MOLLOC_SIZE 1000000000000ul

int main(int argc, char** argv)
{
    try {
        while (true) {
            long* p = new long[MOLLOC_SIZE];
            std::cout << p << " molloc size: " << sizeof(p) * MOLLOC_SIZE << std::endl;
        }
    } catch (const std::bad_alloc& e) {
        std::cerr << e.what() << std::endl;
    }
}
2
3
4
5
6
7
8
9
10
11
12
13
14
运行结果,最后触发了分配失败的异常(数字加一起远超物理内存是因为操作系统默认会给每个程序都分配4G的虚拟内存,当程序使用超过之后才会划拨物理内存给该程序继续作为虚拟内存,物理内存不够之后会划拨硬盘作为虚拟内存,但工作在实模式下的16位程序不受此限制,可以直接操作物理内存。)
0x7000000000 molloc size: 8000000000000
0x7b6a5288000 molloc size: 8000000000000
0xefd4a510000 molloc size: 8000000000000
0x1643ef798000 molloc size: 8000000000000
0x1d8a94a20000 molloc size: 8000000000000
0x24d139ca8000 molloc size: 8000000000000
0x2c17def30000 molloc size: 8000000000000
0x335e841b8000 molloc size: 8000000000000
0x3aa529440000 molloc size: 8000000000000
0x41ebce6c8000 molloc size: 8000000000000
0x493273950000 molloc size: 8000000000000
0x507918bd8000 molloc size: 8000000000000
0x57bfbde60000 molloc size: 8000000000000
0x600020000000 molloc size: 8000000000000
0x6746c5288000 molloc size: 8000000000000
0x6e8d6a510000 molloc size: 8000000000000
0x75d40f798000 molloc size: 8000000000000
std::bad_alloc
2
3
4
5
6
7
8
9
10
11
12
13
14
15
16
17
18
- 使用 std::nothrow 修饰
#include <iostream>
#define MOLLOC_SIZE 1000000000000ul

int main(int argc, char** argv)
{
    while (true) {
        long* p = new (std::nothrow) long[MOLLOC_SIZE];
        std::cout << p << " molloc size: " << sizeof(p) * MOLLOC_SIZE << std::endl;

        if (p == nullptr) {
            std::cerr << "error: bad alloc" << std::endl;
            break;
        }
    }
}
2
3
4
5
6
7
8
9
10
11
12
13
14
15
运行结果,最后一次分配的结果是空指针,也没有抛出异常。
0x7000000000 molloc size: 8000000000000
0x7b6a5288000 molloc size: 8000000000000
0xefd4a510000 molloc size: 8000000000000
0x1643ef798000 molloc size: 8000000000000
0x1d8a94a20000 molloc size: 8000000000000
0x24d139ca8000 molloc size: 8000000000000
0x2c17def30000 molloc size: 8000000000000
0x335e841b8000 molloc size: 8000000000000
0x3aa529440000 molloc size: 8000000000000
0x41ebce6c8000 molloc size: 8000000000000
0x493273950000 molloc size: 8000000000000
0x507918bd8000 molloc size: 8000000000000
0x57bfbde60000 molloc size: 8000000000000
0x600020000000 molloc size: 8000000000000
0x6746c5288000 molloc size: 8000000000000
0x6e8d6a510000 molloc size: 8000000000000
0x75d40f798000 molloc size: 8000000000000
0x0 molloc size: 8000000000000
error: bad alloc
2
3
4
5
6
7
8
9
10
11
12
13
14
15
16
17
18
19
# RAII
资源获取即初始化(Resource Acquisition Is Initialization),或称 RAII,是一种 C++ 编程技术[1][2] ,它将必须在使用前请求的资源(分配的堆内存、执行线程、打开的套接字、打开的文件、锁定的互斥体、磁盘空间、数据库连接等——任何存在于受限供给的事物)的生命周期与一个对象的生存期相绑定
- 引用自 cppreference RAII (opens new window)
C++ 没有GC(自动回收垃圾),这是在程序运行时释放堆内存和其他资源的一个内部进程。C++ 程序需要负责将所有已获取的资源返回到操作系统。 未能释放未使用的资源称为“泄漏”。在进程退出之前,泄漏的资源无法用于其他程序。**新式 C++ 通过声明堆栈上的对象,尽可能避免使用堆内存 **。
当该对象初始化时,它会获取它拥有的资源。然后,该对象负责在其析构函数中释放资源。在堆栈上声明拥有资源的对象本身。对象拥有资源的原则也称为“资源获取即初始化”( RAII)。 **当拥有资源的堆栈对象超出范围时,会自动调用其析构函数。这样,C++ 中的垃圾回收与对象生存期密切相关,是确定性的 **。资源始终在程序中的已知点发布,你可以控制该点。仅类似 C++ 中的确定析构函数可公平处理内存和非内存资源。
- 引用自 MSVC 对象生存期和资源管理(RAII) (opens new window)
# 资源的初始化
而 RAII(源获取即初始化)中的初始化是相对于资源获取而非初始化来讲的。在C语言中,内存分配有三种类型,即:动态、静态、自动。其中自动分配可以被认为是堆栈分配,进入语句时分配内存,退出时释放内存。在 C99 以前,自动分配的变量需要提前知道其大小,因此任何获取任何结构都需要通过(malloc、realloc、calloc、free)在堆中分配和释放内存,并且除 free 外的另外三个函数调用都可能会失败并返回空指针,访问空指针是未定义行为,将立即引发程序异常。所以在这种情况下获取变量并不意味着初始化。
#include <stdio.h>

int main() {
    char * s = (char *)malloc(6); // \0 也算
    strcpy(s, "Hello");

    s = (char *)realloc(s, 7);
    strcat(s, ".");

    free(s);

    return 0;
}
2
3
4
5
6
7
8
9
10
11
12
13
而 RAII 则无需这一切,他会自动在进入时分配内存,退出时释放内存。
#include <iostream>
#include <string>

int main(int argc, char** argv)) {
    std::string s("Hello");
    s += ".";

    return 0;
}
2
3
4
5
6
7
8
9
# 垃圾回收
C++ 并不是没有垃圾回收,而是没有自动垃圾回收。C++ 会在超出作用域(引用中提到的范围)时自动进行资源释放,如果类型为类则会自动调用其析构函数。资源的作用域简单的说就是一对大括号之间,该资源的生命周期从进入大括号开始到退出大括号结束。下面分别演示三种垃圾回收的情况。
#include <iostream>

class Foo {
    int n;

public:
    Foo(int n): n(n) {
        std::cout << "n:" << n << " Foo created" << std::endl;
    }

    ~Foo() {
        std::cout << "n:" << n << " Foo deleted" << std::endl;
    }
};

void f0() {
    Foo a(0);
    Foo a1(1);
    Foo a2(2);
    Foo a3(3);
}

void f1() {
    Foo(0);
    Foo(1);
    Foo(2);
    Foo(3);
}

void f2() {
    { Foo a(0); }
    { Foo a1(1); }
    { Foo a2(2); }
    { Foo a3(3); }
}

int main(int argc, char** argv) {
    std::cout << "f0" << std::endl;
    f0();
    std::cout << "f1" << std::endl;
    f1();
    std::cout << "f2" << std::endl;
    f2();

    return 0;
}
2
3
4
5
6
7
8
9
10
11
12
13
14
15
16
17
18
19
20
21
22
23
24
25
26
27
28
29
30
31
32
33
34
35
36
37
38
39
40
41
42
43
44
45
46
执行结果
- f0 当前函数结束才被统一回收,因为变量的作用域是当前大括号,函数也是一个大括号
- f2 脱离大括号作用域后资源被立即回收
f1 的特殊之处在于仅进行了初始化却没有定义变量。因为无法通过任何形式进行调用它,所以它没有任何“作用”,当然就没有任何作用域。构造函数执行完就会立即被回收。
f0
n:0 Foo created
n:1 Foo created
n:2 Foo created
n:3 Foo created
n:3 Foo deleted
n:2 Foo deleted
n:1 Foo deleted
n:0 Foo deleted
f1
n:0 Foo created
n:0 Foo deleted
n:1 Foo created
n:1 Foo deleted
n:2 Foo created
n:2 Foo deleted
n:3 Foo created
n:3 Foo deleted
f2
n:0 Foo created
n:0 Foo deleted
n:1 Foo created
n:1 Foo deleted
n:2 Foo created
n:2 Foo deleted
n:3 Foo created
n:3 Foo deleted
2
3
4
5
6
7
8
9
10
11
12
13
14
15
16
17
18
19
20
21
22
23
24
25
26
27
# 遵循 RAII 设计类
一个遵循 RAII 设计的类将是资源封装入一个类,其中:构造函数请求资源,并建立所有类不变式,或在它无法完成时抛出异常,析构函数释放资源并且决不会抛出异常。
下面遵循RAII原则设计了一个类似 vector 的类,使用数组作为内部结构,在类内部分配内存并在类销毁(超出作用域)时自动释放。
#include <__format/format_functions.h>
#include <iostream>
#include <mach/mach.h>
#include <mach/mach_host.h>
#include <mach/task.h>
#include <mach/task_info.h>

double get_memory_usage() // only darwin
{
    task_basic_info_data_t t_info;
    mach_msg_type_number_t t_info_count = TASK_BASIC_INFO_COUNT;

    if (task_info(mach_task_self(), TASK_BASIC_INFO, reinterpret_cast<task_info_t>(&t_info), &t_info_count) == KERN_SUCCESS) {
        return t_info.resident_size / 1024.0 / 1024.0;
    }

    return 0;
}

template <class T>
class list {
    long len = 0;
    T* data = nullptr;

public:
    list(int size)
    {
        data = new T[size] {};
    }

    void append(T it)
    {
        data[len] = it;
        len++;
    }

    int size()
    {
        return len;
    }

    ~list()
    {
        delete[] data;
        std::cout << "deleted list, size: " << len << std::endl;
    }
};

int main(int argc, char** argv)
{
    {
        int size = 100000000;
        list l = list<int>(size);
        std::cout << "list size: " << l.size() << std::format(", resident memory {} MB\n", get_memory_usage());

        for (int i = 0; i < size; ++i) {
            l.append(i);
        }

        std::cout << "list size: " << l.size() << std::format(", resident memory {} MB\n", get_memory_usage());
    }

    std::cout << std::format("leave scope, resident {} MB\n", get_memory_usage());
    return 0;
}
2
3
4
5
6
7
8
9
10
11
12
13
14
15
16
17
18
19
20
21
22
23
24
25
26
27
28
29
30
31
32
33
34
35
36
37
38
39
40
41
42
43
44
45
46
47
48
49
50
51
52
53
54
55
56
57
58
59
60
61
62
63
64
65
运行结果
list size: 0, resident memory 394.3125 MB
list size: 100000000, resident memory 394.421875 MB
deleted list, size: 100000000
leave scope, resident 12.9375 MB
2
3
4
# 指针
指针是一个 int 类型,64 位系统下占用 4 个字节。它的本质就是一个内存地址,以下面代码为例,p 的值是 a 内存地址,因为一个 int 类型占用 4 字节,所以 0x16d78728c 到 0x16d78728c + 4 之间的内存都由变量 a 使用。
- 变量 a 是 int 类型,值为 10,内存地址为 0x16d78728c
- 变量 p 是 int* 类型,值为 0x16d78728c
#include <iostream>

void dump(int a, int* p) {
    std::cout
        << " a val " << a
        << " a addr " << &a
        << " p val " << p
        << " *p " << *p
        << " p addr " << &p
        << std::endl;
}

int main(const int argc, char* argv[]) {
    int a = 45;
    int* p = &a;

    dump(a, p);
    *p = 30;
    dump(a, p);
    a = 100;
    dump(a, p);
}
2
3
4
5
6
7
8
9
10
11
12
13
14
15
16
17
18
19
20
21
22
通过以上代码输出,可以直观的看出 p 和 a 的关系
a val 45 a addr 0x16d19726c p val 0x16d19728c *p 45 p addr 0x16d197260
a val 30 a addr 0x16d19726c p val 0x16d19728c *p 30 p addr 0x16d197260
a val 100 a addr 0x16d19726c p val 0x16d19728c *p 100 p addr 0x16d197260
2
3
# 空指针、野指针
指针的默认值是 NULL,没有任何内存地址
int* p = NULL;
自己申请的内存只能自己管理,野指针就是非自己管理的内存空间的地址
int *p = 0x16d10721c;
还有一种常见的野指针场景,即返回局部变量的地址。
因为局部变量存放在栈区,由编译器管理分配与释放,当程序从函数退出时局部变量使用的内存已经被释放了,此时该地址被谁占用是未知的,因此是野指针。
因为可以返回局部变量作为表达式左值,因此局部变量在函数执行完也不会被立即释放,将至少会保留一次。
#include <iostream>

int* foo() {
    int a = 100;
    return &a;
}

int main() {
    int* p = foo();

    std::cout << *p << " " << p << std::endl; // 编译器会保留一次
    std::cout << *p << " " << p << std::endl; // 野指针

    return 0;
}
2
3
4
5
6
7
8
9
10
11
12
13
14
15
运行结果
100 0x16f94728c
1 0x16f94728c
2
# const 修饰指针
const 修饰指针时语法非常的反直觉。据说这种设计能让程序员更加慎重的使用指针。
| 修饰 | 举例 | 指针重新赋值 | 引用重新赋值 |
|---|---|---|---|
| 指针 | const int* p = &a; | 可以 | 可以 |
| 常量 | int* const p = &a; | 不可以 | 可以 |
| 同时 | const int* const p = &a; | 不可以 | 不可以 |
当 const 在 * 左侧时修饰的是指针指向的值而不是指针本身,所以可以修改引用,但不能进行解引用后修改其值。
int a = 100;
// 相当于引用 const int a,因此无法为 *p 赋值,因为 a 是一个常量
const int* p = &a;
2
3
当 const 在 * 右侧时修改的是指针本身,所以可以进行解引用并修改值,但不能将指针修改为引用其他变量。
int a = 100;
// 相当于 p 类型是 const int,因此无法为 p 赋值,因为 p 是常量
int* const p = &a;
2
3
当 const 同时修饰时指针和引用都不能重新赋值,所以比较好理解。
int a = 100;
const int* const p = &a;
2
# 引用
引用的本质就是某个值的常量指针,使用前必须初始化,且不允许改变其指向。在使用时int& p = n; 与 int* const p1 = &n; 等效,
p 与
*p1 等效
#include <iostream>

void boo(int& a) {
    a = 1000;
}

int main(const int argc, char** argv) {
    int n = 100;
    int& p = n;

    p = INT_MAX;
    std::cout << "p " << p << " n " << n << std::endl;

    boo(p);
    std::cout << "p " << p << " n " << n << std::endl;

    p = 967879;
    std::cout << "p " << p << " n " << n << std::endl;
    boo(n);
    std::cout << "p " << p << " n " << n << std::endl;

    return 0;
}
2
3
4
5
6
7
8
9
10
11
12
13
14
15
16
17
18
19
20
21
22
23
运行结果为
p 2147483647 n 2147483647
p 1000 n 1000
p 967879 n 967879
p 1000 n 1000
2
3
4
引用静态变量,和作为将函数调用左值
#include <iostream>

int& ref_static() {
    static int a = 100;
    return a;
}

int main(const int argc, char** argv) {
    const int& var = ref_static();
    const int var1 = ref_static();
    std::cout << var << " " << var1 << std::endl;

    ref_static() = 10000;
    std::cout << var << " " << var1 << std::endl;

    return 0;
}
2
3
4
5
6
7
8
9
10
11
12
13
14
15
16
17
var 作为 static int a 的引用,所以当 a 改变时,var 也会改变。但 var1 仅仅是拷贝了变量的值,所以不会因为 a 的改变而改变。函数结果作为左值本质上和 var 变量一样,只是一种奇怪的语法。
运行结果为:
100 100
10000 100
2
也可以这么写,但引用局部变量没什么用
int& ref_var() {
    int a = 100;
    return a;
}
2
3
4
# 引用常量
被引用的必须是合法的内存空间且不是字面量,一般用于保护形参不被修改。
#include <iostream>

void boo(const int& a) {
    // a = 100; 不合法,因为 const 不允许修改
}

int main(const int argc, char** argv) {
    int a = 0;

    // int& n = 1000; 不合法,因为不能引用字面量
    const int& n3 = 1000; // 合法,编译器会自动处理成合法的内存空间
    const int& n2 = a;

    boo(n2);
    return 0;
}
2
3
4
5
6
7
8
9
10
11
12
13
14
15
16
# 数组指针
数组是一段连续的地址空间,使用变量定义一个数组时,变量本身就是数组首地址的指针。 所以要取数组首地址的指针只需要将变量转换为 int * 即可。
#include <iostream>

int main(const int argc, char* argv[]) {
    // arr 是数组 arr[] 的首地址,arr = 0x16d553274 *arr = 5
    int arr[] = {5, 6, 7, 8, 9};
    int* p = arr; // p 就是 arr 的地址,即 0x16d553274

    for (int i = 0; i < std::size(arr); ++i) {
        std::cout << p << " " << *p << std::endl;
        p++;
    }
}
2
3
4
5
6
7
8
9
10
11
12
指针的递增行为取决于指针所指向的数据类型的大小,对于 int* 类型,每次递增指针会向前移动一个 int 类型数据的大小。所以会使用 p++ 而不是 p + 4。
通过运行结果也可以很轻松的观察到这一点
0x16b19f280 5
0x16b19f284 6
0x16b19f288 7
0x16b19f28c 8
0x16b19f290 9
2
3
4
5
# 智能指针(Smart pointers)
又名托管指针 Managed pointers,不同于普通指针需要手动 delete 释放占用的内存,智能指针旨在提供自动、异常安全的对象生存期管理。
int *p = new int(100);
delete p;
2
C++ 在
# 独享对象所有权指针 std::unique_ptr(C++ 11)
唯一指针用法较为简单,简单来说就是持有一个堆上分配的内存地址,根据前文 RAII 中 “当拥有资源的堆栈对象超出范围时,会自动调用其析构函数” 原理,在其析构函数中自动 delete 持有的内存地址即可实现。
和 make_share 类似,unique_ptr 也可以使用 make_unique 进行初始化
#include <iostream>

class Foo {
    int id;

public:
    Foo(int id)
        : id(id)
    {
        std::cout << id << " Foo constructor" << std::endl;
    }

    ~Foo()
    {
        std::cout << id << " Foo deleted" << std::endl;
    }

    // 重载解引用运算符
    int operator*() const
    {
        return id;
    }
};

void unique_reset()
{
    std::unique_ptr<Foo> p(new Foo(0));
    std::cout << "id " << **p << " p" << p << std::endl;
    p.reset(new Foo(1));
    std::cout << "reset to id " << **p << " p" << p << std::endl;

    std::unique_ptr<Foo> p1 = std::move(p);
    std::cout << "p " << p << " p1 " << p1 << std::endl;
}

int main()
{
    unique_reset();
    return 0;
}
2
3
4
5
6
7
8
9
10
11
12
13
14
15
16
17
18
19
20
21
22
23
24
25
26
27
28
29
30
31
32
33
34
35
36
37
38
39
40
运行结果
- 因为是唯一引用,所以 reset 时会立即析构原对象。
- 只能通过 move 语义来改变唯一指针的指向,移动之后原 unique_ptr 将成为空指针
0 Foo constructor
id 0 p0x6000007b0030
1 Foo constructor
0 Foo deleted
reset to id 1 p0x6000007b0040
p 0x0 p1 0x6000007b0040
1 Foo deleted
2
3
4
5
6
7
# 共享对象所有权指针 std::share_ptr(C++ 11)
共享指针可以使用 ptr(new int(10)) 或 make_shared<int>(10) 实现构造,同时也支持直接引用另一个共享指针(也即 share_ptr
中共享的来源),此时可以通过 .use_count() 打印引用计数。
#include <iostream>

int main()
{
    std::shared_ptr<int> ptr = std::make_shared<int>(1009);
    std::cout << "pointer " << ptr << " value " << *ptr << std::endl;
    std::cout << "pointer " << ptr.get() << " ref count " << ptr.use_count() << std::endl;

    std::shared_ptr<int> ptr1 = ptr;
    std::shared_ptr<int> ptr2 = ptr;
    std::cout << "ref count " << ptr.use_count() << std::endl;

    return 0;
}
2
3
4
5
6
7
8
9
10
11
12
13
14
pointer 0x6000009ed218 value 1009
pointer 0x6000009ed218 ref count 1
ref count 3
2
3
# 共享指针何时被释放
在析构函数被调用且引用计数器为1时,因为自己总会持有一个计数器,所以永远不可能为 0
#include <__format/format_functions.h>
#include <iostream>
#include <mach/mach.h>
#include <mach/mach_host.h>
#include <mach/task.h>
#include <mach/task_info.h>

double get_memory_usage()
{
    task_basic_info_data_t t_info;
    mach_msg_type_number_t t_info_count = TASK_BASIC_INFO_COUNT;

    if (task_info(mach_task_self(), TASK_BASIC_INFO, reinterpret_cast<task_info_t>(&t_info), &t_info_count) == KERN_SUCCESS) {
        return t_info.resident_size / 1024.0 / 1024.0;
    }

    return 0;
}

void test_share_ptr(std::string* s)
{
    std::shared_ptr<std::string> ptr(s);
    {
        std::shared_ptr<std::string> ptr1 = ptr;
        std::cout << "ref count " << ptr.use_count() << " usage " << get_memory_usage() << "MB" << std::endl;
    }

    std::cout << "ref count " << ptr.use_count() << " usage " << get_memory_usage() << "MB" << std::endl;
}

int main()
{
    std::cout << "setup usage " << get_memory_usage() << "MB" << std::endl;

    std::string* s = new std::string(8192000, 35);
    std::cout << "len " << s->length() << " empty " << s->empty() << std::endl;
    test_share_ptr(s);

    std::cout << "len " << s->length() << " empty " << s->empty() << std::endl;
    std::cout << "exit usage " << get_memory_usage() << "MB" << std::endl;

    return 0;
}
2
3
4
5
6
7
8
9
10
11
12
13
14
15
16
17
18
19
20
21
22
23
24
25
26
27
28
29
30
31
32
33
34
35
36
37
38
39
40
41
42
43
执行结果
test_share_ptr(s) 执行之后,s 和被 delete 之后的效果一致,所占用的内存已经由共享指针自动释放。系统内存没有消失可能和平台相关,不做考虑。
setup usage 1.10938MB
len 8192000 empty 0
ref count 2 usage 8.98438MB
ref count 1 usage 8.98438MB
len 0 empty 1
exit usage 8.98438MB
2
3
4
5
6
# 共享指针的 reset
共享指针可以调用 reset 方法更换当前指向的指针,回收原来的指针指向的内存(如果引用计数器为0)。如果指针已经被共享,则只有当已共享指针计数器也为0时才会进行回收
#include <iostream>

class Foo {
    int id;

public:
    Foo(int id)
        : id(id)
    {
        std::cout << id << " Foo constructor" << std::endl;
    }

    ~Foo()
    {
        std::cout << id << " Foo deleted" << std::endl;
    }

    // 重载解引用运算符
    int operator*() const
    {
        return id;
    }
};

void noshared_reset()
{

    std::shared_ptr<Foo> p(new Foo(0));
    std::cout << "id " << **p << " use count " << p.use_count() << std::endl;
    p.reset(new Foo(1));
    std::cout << "reset to id " << **p << " use count " << p.use_count() << std::endl;
}

void shared_reset()
{
    std::shared_ptr<Foo> p(new Foo(0));
    std::shared_ptr      p1(p);
    std::shared_ptr      p2(p);
    std::cout << "p id " << **p << " use count " << p.use_count() << std::endl;
    std::cout << "p1 id " << **p1 << " use count " << p1.use_count() << std::endl;
    std::cout << "p2 id " << **p2 << " use count " << p2.use_count() << std::endl;
    p.reset(new Foo(1));
    std::cout << "reset p id " << **p << " use count " << p.use_count() << std::endl;
    std::cout << "p1 id " << **p1 << " use count " << p1.use_count() << std::endl;
    std::cout << "p2 id " << **p2 << " use count " << p2.use_count() << std::endl;
}

int main()
{
    std::cout << "共享指针没有被共享时产生 reset" << std::endl;
    noshared_reset();

    std::cout << "共享指针被共享时产生 reset" << std::endl;
    shared_reset();
    return 0;
}
2
3
4
5
6
7
8
9
10
11
12
13
14
15
16
17
18
19
20
21
22
23
24
25
26
27
28
29
30
31
32
33
34
35
36
37
38
39
40
41
42
43
44
45
46
47
48
49
50
51
52
53
54
55
56
运行结果
- 没有被共享时 reset 会立即调析构持有的对象
- 被共享时 reset 只会将当前共享指针的计数器设为1,持有原对象的共享指针的计数器减1。持有原对象的共享指针计数器为0时才析构原对象
共享指针没有被共享时产生 reset
0 Foo constructor
id 0 use count 1
1 Foo constructor
0 Foo deleted
reset to id 1 use count 1
1 Foo deleted
共享指针被共享时产生 reset
0 Foo constructor
p id 0 use count 3
p1 id 0 use count 3
p2 id 0 use count 3
1 Foo constructor
reset p id 1 use count 1
p1 id 0 use count 2
p2 id 0 use count 2
0 Foo deleted
1 Foo deleted
2
3
4
5
6
7
8
9
10
11
12
13
14
15
16
17
18
# 弱共享指针 std::weak_ptr(C++ 11)
实现临时所有权:当某个对象只有存在时才需要被访问且随时可能被他人删除时,可以使用 std::weak_ptr 来跟踪该对象,需要获得临时所有权时,将其转换为 std::shared_ptr。
只有环形引用之类的场景会用到。
- 简单来说可以提前声明一个 weak_ptr 不做任何用途
- 当需要时将 share_ptr 赋值给它,通过 lock 方法来判断该 share_ptr 获取临时所有权以使用该 share_ptr,此获取流程是可判断的。
- 离开作用域时 share_ptr 根据自身机制自动销毁,持有这个 share_ptr 的 weak_ptr 也将会重新回到无用的状态。此时获取临时所有权将会失败。
- 又可以重新赋值给他新的 share_ptr
#include <iostream>

std::weak_ptr<int> w;

void weak()
{
    if (std::shared_ptr<int> ptr = w.lock()) {
        std::cout << ptr << std::endl;
    } else {
        std::cout << "failed " << ptr << std::endl;
    }
}

int main()
{
    {
        std::shared_ptr sp = std::make_shared<int>(42);
        w                  = sp;
        weak();
    }

    weak();
    weak();

    std::shared_ptr sp = std::make_shared<int>(42);
    w                  = sp;
    weak();

    return 0;
}
2
3
4
5
6
7
8
9
10
11
12
13
14
15
16
17
18
19
20
21
22
23
24
25
26
27
28
29
30
执行结果
- 第一次在作用域内成功获取共享指针
- 第 2 3 次共享指针已被 RAII 释放,临时所有权获取失败
- 第 4 次又重新赋值了,获取成功。
0x600003059218
failed 0x0
failed 0x0
0x600003059238
2
3
4
# 使用共享指针管理数组
#include <iostream>

void list(int* p)
{
    std::shared_ptr<int[]> a(p, [](int a[]) {
        delete[] a;
    });
}

int main()
{
    int* p = new int[] { 100, 20, 3, 1 };
    std::cout << "p " << p << " *p " << *p << std::endl;
    list(p);
    std::cout << "p " << p << " *p " << *p << std::endl;

    return 0;
}
2
3
4
5
6
7
8
9
10
11
12
13
14
15
16
17
18
运行结果
- p 变成了野指针
- 这个例子也可以用 weak_ptr
p 0x600001108030 *p 100
p 0x600001108030 *p 1692565552
2
# 值语义与引用语义
C++ 中分为值语义(value sematics)与引用语义(reference sematics),值语义简单来说就是拷贝的对象和原对象无关,就像拷贝 int 一样。例如:C++ 中int/string/vector/map 等类型都是值语义。
# 内置类型的值语义
拷贝之后改变原值并不会影响拷贝值
#include <iostream>

int main(int argc, char** argv)
{
    int a = 19;
    int b = a;

    std::cout << a << " " << &a << std::endl;
    std::cout << b << " " << &b << std::endl;

    a = 100;

    std::cout << a << " " << &a << std::endl;
    std::cout << b << " " << &b << std::endl;

    return 0;
}
2
3
4
5
6
7
8
9
10
11
12
13
14
15
16
17
19 0x16ce0726c
19 0x16ce07268
100 0x16ce0726c
19 0x16ce07268
2
3
4
指针也具有值语义,但因为拷贝的是一个内存地址,在现象上容易混淆。b = a 的赋值过程实际上复制了一个内存地址,而地址本质上也是一个 int 值。这一特点可以体现在重新为原值赋值新指针,而拷贝值不变。
#include <iostream>

int main(int argc, char** argv)
{
    int* a = new int(19);
    int* b = a;

    std::cout << a << " " << *a << std::endl;
    std::cout << b << " " << *b << std::endl;

    a = new int(100);

    std::cout << a << " " << *a << std::endl;
    std::cout << b << " " << *b << std::endl;

    return 0;
}
2
3
4
5
6
7
8
9
10
11
12
13
14
15
16
17
运行结果
0x600003fe45b0 19
0x600003fe45b0 19
0x600003fe45c0 100
0x600003fe45b0 19
2
3
4
# 自定义类型的值语义
值语义有一个简单的特点,即允许使用 = 运算拷贝一个一模一样的对象。一旦一个对象失去了值语义,随之也将会失去 = 运算。这涉及到 C++ 的设计问题,C 语言希望用户定义类型与内置类型一样工作,具有同等地位。C++ 也继承了这一特性,例如
- C++ 的 layout 和 C 的 struct 一样都是无开销的
- C++ 的 class 可以在堆上创建,也可以在栈上创建,因为 int 等内置类型是栈变量
- C++ 的 class 在传入函数时默认是拷贝的,因为 int 等内置类型在传入时是拷贝的
- C++ 的 class 在被函数返回时默认是拷贝的,因为 int 等内置类型在被函数返回时是拷贝的
- C++ type 作为成员时,数据成员是嵌入的(简单说就是一个类中无论有什么成员类型,在 layout 层面都是连续的)
下面这个类具有值语义是因为 int 具有值语义,且因为 C++ 的无开销设计,当一个类只有一个 int 属性时和直接定义 int 的开销是一样的。
#include <iostream>

class Foo {
public:
    int n;
    Foo(int n): n(n){}
};

int main(int argc, char** argv)
{
    Foo f(18);
    Foo f1 = f;

    std::cout << f.n << " " << f1.n << std::endl;
    f.n = 100;

    std::cout << f.n << " " << f1.n << std::endl;

    return 0;
}
2
3
4
5
6
7
8
9
10
11
12
13
14
15
16
17
18
19
20
运行结果
18 18
100 18
2
C++ 会为每个类生成拷贝构造函数,当一个类需要在内部管理内存资源时,将会立即失去值语义,例如运行如下代码将会立即触发错误
malloc: Double free of object 0x1536071f0 和中断 interrupted by signal 6:SIGABRT
。如果一定要该类具有值语义,可以重写拷贝构造函数和重载赋值运算符,使用类似引用计数器的机制实现。
#include <iostream>

class Foo {

public:
    int* n;

    Foo() {
        n = new int[100];
    }

    ~Foo() {
        delete[] n;
    }
};

int main(int argc, char** argv)
{
    Foo f;
    Foo f1 = f;

    std::cout << &f1.n[0] << std::endl;

    return 0;
}
2
3
4
5
6
7
8
9
10
11
12
13
14
15
16
17
18
19
20
21
22
23
24
25
# 引用语义
引用语义与值语义相对,修改拷贝值或修改原值都会互相影响。并且引用语义的对象应该是禁止拷贝的,因为拷贝无意义。例如系统并不会拷贝了线程类就增加一个一模一样的线程。拷贝 TCP 连接也并不能获取两个连接。
# 所有权
获取所有权就是保障对象的生命周期,对象维持不销毁的状态时就认为拥有了该对象的所有权,不过拥有所有权之后也可以手动销毁该对象。
- 局部对象
和前面所说的一样,生命周期是一个完整的大括号,资源释放是自动完成的。
- 嵌入对象
一个对象拥有所有嵌入其中的对象时,释放过程也是自动的。即先释放自己,再释放自己持有所有权的对象。
# 左值与右值
左值即一个内存地址,右值为只读临时对象。左值可以赋值为右值,右值不能赋值为左值。简单理解等号左边是左值,反之为右值。
这个例子里 a 是左值,10 是右值,a 有地址可以任意赋值,右值没有地址不行。
int a = 10;
函数调用一般是右值,但也可以是左值
int t() { return 0; }
int& tp() { return 0; }

int res = t();
tp() = 10;
2
3
4
5
- 在第4行中返回值是一个标量,因此不能做左值,但可以做右值。
- 第5行中返回值是一个地址,因此可以做左值。但临时变量离开作用域后地址被释放,所以这次的赋值没有实际意义
# const
虽然 value 是引用,但它因为 const 的存在它也可以接受右值,因此这两种调用方式都是合法的。
void foo(const int& value);

int a = 6;
foo(&a);
foo(1);
2
3
4
5
仅接受右值,无论如何传入
void foo(const int&& value);
# 移动语义
我们很多时候都会单纯的在程序里创建一些右值来使用,当它们被传递给函数时会产生一次复制,如果能够避免这次复制直接将原来的右值移动过去程序的性能就会大大提高。
- 这种移动的本质即是所有权变更,通俗的讲如果一个对象具有移动语义,则它的所有权可以被转移,转移后原始定义状态变为有效但未定义。
- 如果移动的是复杂对象,那么对象本身并不会被移动或销毁。它只是其成员复杂数据结构的变量的内容被移动了,例如它的 std::string 属性的内容会被移动,此时这个复杂对象将不会再持有这个复杂数据类型属性的所有权,但值得注意的是基本数据类型例如 int 在 move 时只会被复制。
- 事实上移动 struct 比较简单,移动 class 很多情况下仍然会触发复制,这一点可以在拷贝构造函数中观察到。
#include <iostream>

struct Bar {
    int         id;
    std::string name;
};

class Foo {
public:
    Bar bar;

    Foo(Bar& bar)
    {
        this->bar = std::move(bar);
    }
};

int main(int argc, char** argv)
{
    Bar bar = {
        .id   = 100001,
        .name = "foo"
    };
    std::cout << std::format("name:{} id:{} ptr:{:p}\n", bar.name, bar.id, static_cast<void*>(&bar));

    Foo f(bar);
    std::cout << std::format("name:{} id:{} ptr:{:p}\n", bar.name, bar.id, static_cast<void*>(&bar));
    std::cout << std::format("Foo.name:{} id:{} ptr:{:p}\n", f.bar.name, f.bar.id, static_cast<void*>(&f.bar));

    return 0;
}
2
3
4
5
6
7
8
9
10
11
12
13
14
15
16
17
18
19
20
21
22
23
24
25
26
27
28
29
30
31
运行结果
- bar 的 id 属性是基本数据类型,会被直接复制。而不是移动
- bar 的 name 属性是复杂数据类型,它管理着自己的动态内存。当 std::move 时,std::string 的移动构造函数或移动赋值运算符会被调用(取决于上下文)
name:foo id:100001 ptr:0x16bb7edf0
name: id:100001 ptr:0x16bb7edf0
Foo.name:foo id:100001 ptr:0x16bb7ed90
2
3
# 完美转发
完美转发的原理涉及到“引用折叠”和“模板推导”,此处进行知识屏蔽,只讲用法不深入原理。
# 右值退化
左值右值在函数调用时,都会退化为左值。
#include <iostream>

void test(const std::string& name)
{
    std::cout << "左值" << " " << name << std::endl;
}

void test(const std::string&& name)
{
    std::cout << "右值" << " " << name << std::endl;
}

void test1(std::string&& name)
{
    test(name);
    test(std::move(name));
    test(std::forward<std::string>(name));
}

template <typename T>
void test2(T&& name)
{
    test(std::forward<std::string>(name));
}

int main(int argc, char** argv)
{
    test1("Alex");

    std::cout << "test2 --------" << std::endl;
    test2("Right");
    std::string string = "Left";
    test2(string);
    return 0;
}
2
3
4
5
6
7
8
9
10
11
12
13
14
15
16
17
18
19
20
21
22
23
24
25
26
27
28
29
30
31
32
33
34
35
输出结果
- test1 中的第1次调用:因为虽然传入 test1 的是右值,但接收到实参后 test1 中产生了退化,变成了左值。
- test1 中的第2次调用:std::move 会的转移语义,就是为了无论如何都变成右值
- test1 中的第3次调用:std::string&& name 这样的声明只能接受右值引用,所以转发出去也是右值。这里不产生退化是因为完美转发会自动识别左值还是右值。
- test2 第1次调用:传入的是字面量,本质上就是右值。所以完美转发也是右值
- test2 第2次调用:
- 因为声明的 string 是一个左值,它在内存中有一个固定的位置,并且可以被多次访问以修改其内容
- 当这个左值作为参数使用值传递给函数时,传递的是这个左值的一个副本,因此完美转发自然会识别为左值
- test1 不使用左值调用的原因是,test1 的声明根本不接受左值。
- test2 一定要使用模板的原因是,如果不使用模板则会像 test1 一样永远只能得到右值,体现不出完美转发的作用。
左值 Alex
右值 Alex
右值 Alex
test2 --------
右值 Right
右值 Left
2
3
4
5
6
# 函数
# 值传递
void swap(int a, int b) {
    const int temp = a;
    a = b;
    b = temp;
}
2
3
4
5
调用后,值不会随着函数的调用而改变。
int a = 1, b = 2;

swap(a, b);
2
3
# 引用传递
调用方式不变,但原值会随着函数的调用而改变
void swap(int& a, int& b) {
    const int temp = a;
    a = b;
    b = temp;
}
2
3
4
5
# 指针传递
调用方式不变,实参变为取地址,原值会随着函数的调用而改变
void swap(int* a, int* b) {
    const int temp = *a;
    *a = *b;
    *b = temp;
}
2
3
4
5
# 默认参数
古代特性,新语言基本都不支持。
#include <iostream>

int boo(int a = 100) {
    return a;
}

int main(const int argc, char** argv) {
    std::cout << boo() << std::endl;
    std::cout << boo(222) << std::endl;
    return 0;
}
2
3
4
5
6
7
8
9
10
11
# 占位参数
新的语言基本都有改进,比如 go 语言允许使用 _ 作为占位参数。
- 占位参数必须传递 boo1()
- 占位参数也可以有默认值 boo2()
- 当前一个参数有默认值时后续占位参数都不需要传值 boo3()
#include <iostream>

int boo1(int a, int) {
    return a;
}

int boo2(int a, int = 100) {
    return a;
}

int boo3(int a, int, int = 100, int, int, int) {
    return a;
}

int main(const int argc, char** argv) {
    std::cout << boo1(222, 0) << std::endl;
    std::cout << boo2(222) << std::endl;
    std::cout << boo3(0, 100, 1) << std::endl;

    return 0;
}
2
3
4
5
6
7
8
9
10
11
12
13
14
15
16
17
18
19
20
21
# 重载
古代特性,新语言基本都不支持。
将一个函数当作多个使用,提升函数的复用性。语法是同一作用域下,函数参数类型、个数、顺序有其一不同时,函数可以同名。出现一个以上同名函数,就称之为函数重载。
#include <iostream>
using namespace std;

void boo(int a) {
    std::cout << "a " << a << std::endl;
}

void boo(int a, int b) {
    std::cout << "a " << a << " b " << b << std::endl;
}

void boo(int a, string n) {
    std::cout << "a " << a << " n " << n << std::endl;
}

int main(const int argc, char** argv) {
    boo(1);
    boo(1, 1);
    boo(1, "NAME");

    return 0;
}
2
3
4
5
6
7
8
9
10
11
12
13
14
15
16
17
18
19
20
21
22
运行结果
a 1
a 1 b 1
a 1 n NAME
2
3
特殊情况:引用参数重载
#include <iostream>
using namespace std;

void boo(int &a) {
    std::cout << "int " << a << std::endl;
}

void boo(const int &a) {
    std::cout << "const int " << std::endl;
}

int main(const int argc, char** argv) {
    int a = 100;
    boo(a); // a 是变量
    const int b = 1020;
    boo(b); // b 是常量
    boo(2); // 字面量也是常量

    return 0;
}
2
3
4
5
6
7
8
9
10
11
12
13
14
15
16
17
18
19
20
此时将会根据传入参数的特点决定调用哪个
int 100
const int
const int
2
3
这样不允许
void boo1(int a) {
    std::cout << "int " << a << std::endl;
}

void boo1(const int a) {
    std::cout << "const int " << std::endl;
}
2
3
4
5
6
7
特殊情况:因为默认参数,重载函数出现二义性
#include <iostream>
using namespace std;

void boo(int a) {
    std::cout << "int " << a << std::endl;
}

void boo(int a, int b = 100) {
    std::cout << "int " << a << std::endl;
}

int main(const int argc, char** argv) {
    boo(2); // 编译器无法确认调用哪个
    boo(2, 100); // 正常

    return 0;
}
2
3
4
5
6
7
8
9
10
11
12
13
14
15
16
17
# inline 关键字
inline 关键字的作用是向编译器提出请求将函数代码在调用点内联展开,而不是通过常规的函数调用机制来执行。概念和宏差不多,但对于编译器可以拒绝 inline 请求。这样做的目的是减少函数调用的开销,包括避免函数调用的栈帧生成、参数传递和返回值处理等。
例如下面的代码,编译器可能会将第六行对于 square 函数的调用替换为 n * n 表达式。
inline int square(int n) {
    return n * n;
}

int main() {
    int result = square(5);

    return 0;
}
2
3
4
5
6
7
8
9
# 属性 (attribute)
属性的目的是让程序员可以和编译器交互,在此之前通过类似 GNU/IBM 的
__attribute__(()) 实现同样的工作,MSVC也有类似的实现,因此甚至引发了编译器之间的分裂,在避免增加关键字破坏当前的C++语法的同时
C++ 11 加入了该特性,从此之后所有的 C++ 属性都应该在双方括号中间。
# [[nodiscard]]
在 C++ 11 之前的 GNU/IBM 编译体系中,可能写作
__attribute__((nodiscard)),它告诉编译器函数的返回值不应该被忽略,这在那些依赖于返回值的函数中尤为有用,该属性在函数、类、构造函数、枚举上声明都是可能的。
class [[nodiscard]] A {
public:
    [[nodiscard]] A() = default;
};

[[nodiscard]] int foo() {
    return 1;
}

int main(int, char*[]) {
    foo();
    A{};
    A();

    return 0;
}
2
3
4
5
6
7
8
9
10
11
12
13
14
15
16
引发了如下编译警告,如果通过 ignore 明确忽略 std::ignore = A(); 则不会引发编译警告。
cmake --build cmake-build-debug --target all -j 8
[2/3] Building CXX object CMakeFiles/main.dir/main.cpp.o
main.cpp:11:5: warning: ignoring return value of function declared with 'nodiscard' attribute [-Wunused-result]
    foo();
    ^~~
main.cpp:12:5: warning: ignoring return value of function declared with 'nodiscard' attribute [-Wunused-result]
    A{};
    ^~~
main.cpp:13:5: warning: ignoring temporary created by a constructor declared with 'nodiscard' attribute [-Wunused-value]
    A();
    ^~~
3 warnings generated.
[3/3] Linking CXX executable main
2
3
4
5
6
7
8
9
10
11
12
13
# [[noreturn]]
[[noreturn]] int foo() {
    return 1;
}

int main(int, char*[]) {
    return 0;
}
2
3
4
5
6
7
引发了如下编译警告
cmake --build cmake-build-debug --target all -j 8
[2/3] Building CXX object CMakeFiles/main.dir/main.cpp.o
main.cpp:2:5: warning: function 'foo' declared 'noreturn' should not return [-Winvalid-noreturn]
    return 1;
    ^
1 warning generated.
[3/3] Linking CXX executable main
2
3
4
5
6
7
# extern "C"
C 语言的 extern 关键字和 C++ 中的不同
# 数据结构
# 字符串
# C风格字符串
# std::format
# 原始字符串字面量(Raw String Literal)
// R"(xx)" 支持非转义字符串,类似 ``
# 数组
// 指定长度
int a[5] = {
1, 3, 4, 2, 1
};
// 自动推测
int a[] = {
1, 3, 4, 2, 1
};
// 多维数组
int a[2][2] = {
{
1, 2
},
{
2, 2
},
};
2
3
4
5
6
7
8
9
10
11
12
13
14
15
16
17
案例,考试总分计算
#include <iostream>

int main(const int argc, char* argv[]) {
    int scores[3][3] = {
        {100, 100, 100},
        {90, 50, 100},
        {60, 70, 80}
    };

    for (int i = 0; i < std::size(scores); ++i) {
        std::string name = "";

        switch (i) {
        case 0:
            name = "张三";
            break;
        case 1:
            name = "李四";
            break;
        case 2:
            name = "王五";
            break;
        default:
            continue;
        }

        std::cout << name << ": ";

        int sum = 0;
        for (int j = 0; j < std::size(scores[i]); ++j) {
            sum += scores[i][j];
            std::cout << scores[i][j] << " ";
        }

        std::cout << "总分:" << sum << std::endl;
        sum = 0;
    }
}
2
3
4
5
6
7
8
9
10
11
12
13
14
15
16
17
18
19
20
21
22
23
24
25
26
27
28
29
30
31
32
33
34
35
36
37
38
# 结构体
自定义数据类型的组合,用法与 go 结构体基本一致
声明
struct Student {
    std::string name;
    int age;
    int score;
};
2
3
4
5
定义
在 C++ 中定义结构体变量时 struct 可以省略,即 struct Student stu3 与 Student stu3 完全等效
定义方式1
struct Student stu;
stu.name = "Alex";
stu.age = 18;
stu.score = 100;
2
3
4
定义方式2
Student stu3 = {"Alice",};
Student stu4 = {.name = "Jack", .score = 20};
2
定义方式3,一定要有构造函数,后面会提到
Student stu1 = Student("Jack", 12, 60);
Student stu2 = Student(.name = "", .age = 19, .score = 80);
2
定义方式4,声明时定义
struct Student {
    std::string name;
    int age;
    int score;
} stu;
2
3
4
5
案例
#include <iostream>

struct Student {
    std::string name;
    int age;
    int score;
};

void student_dump(Student stu);

int main(const int argc, char* argv[]) {
    struct Student stu;
    stu.name = "Alex";
    stu.age = 18;
    stu.score = 100;
    student_dump(stu);

    struct Student stu3 = {"Alice",};
    struct Student stu4 = {.name = "Jack", .score = 20};

    student_dump(stu3);
    student_dump(stu4);
}

void student_dump(Student stu) {
    std::cout << stu.name << " " << stu.age << " " << stu.score << std::endl;
}
2
3
4
5
6
7
8
9
10
11
12
13
14
15
16
17
18
19
20
21
22
23
24
25
26
27
执行结果
Alex 18 100
Alice 0 0
Jack 0 20
2
3
# 嵌套结构体
与 c、go 语言一样,不在赘述
#include <iostream>
using namespace std;

struct a {
    string name;
};

struct n {
    a a;
};


int main(const int argc, char** argv) {
    n n1 = {};
    n1.a = {"Hello"};

    std::cout << n1.a.name << std::endl;

    return 0;
}
2
3
4
5
6
7
8
9
10
11
12
13
14
15
16
17
18
19
20
执行结果
Hello
# 强制类型转换
C++ 支持C风格的强制类型转换的同时还有四种特有的强制类型转换运算符
# static_cast
编译时进行基本数据类型之间的转换,以及有继承关系的指针或引用之间的转换(但不进行类型检查),相对比较安全。
#include <iostream>

class Base {
};

class Foo : public Base {
};

int main(int, char*[]) {
    float f = 3.14f;
    int i = static_cast<int>(f);
    std::cout << "static_cast before: " << typeid(f).name() << " ,after: " << typeid(i).name() << std::endl;

    Foo* d = new Foo();
    Base* b = static_cast<Base*>(d);

    std::cout << "static_cast before: " << typeid(d).name() << " ,after: " << typeid(b).name() << std::endl;
    return 0;
}
2
3
4
5
6
7
8
9
10
11
12
13
14
15
16
17
18
19
运行结果可见转换后类型符合预期
static_cast before: f ,after: i
static_cast before: P3Foo ,after: P4Base
2
# const_cast
用于修改类型的 const 或 volatile 属性。它主要用于去除指针或引用的 const 限定符,以便能够修改原本定义为 const 的数据,滥用该特性可能会导致未定义行为
#include <iostream>

int main(int, char*[]) {
    const int* cp = new int(100);
    int* np = const_cast<int*>(cp);
    *np = 20;

    std::cout << *np << std::endl;

    delete cp;

    return 0;
}
2
3
4
5
6
7
8
9
10
11
12
13
运行结果
20
# reinterpret_cast
低级转换,重新解释指针或引用的位模式,将其视为不同的类型。这种转换非常危险,因为它几乎不进行任何类型检查,只是简单地重新解释内存中的位。
下面代码中从 bytes 强制转换 char 时,因为 char 只占用1个字节,所以只取出了bytes的第一个字节,0x77 即 ascii 的 w。转换 int
则会取出前四个字节,因为 int 占用 4 字节。同理也可以使用类似方法将数据转换结构体,类似 C 风格的
struct_name* eth = (STRUCT_NAME*)bytes;
#include <iostream>

int main(int, char*[]) {
    unsigned char bytes[] = {
        0x77, 0x34, 0x56, 0x78, 0x9A, 0xBC, 0xDE, 0xF0,
        0x12, 0x34, 0x56, 0x78, 0x9A, 0xBC, 0xDE, 0xF0,
    };

    char value = *(reinterpret_cast<char*>(bytes));
    int iv = *(reinterpret_cast<int*>(bytes));

    std::cout << value << std::endl;
    std::cout << std::showbase << std::hex << iv << std::endl;

    return 0;
}
2
3
4
5
6
7
8
9
10
11
12
13
14
15
16
运行结果
w
0x78563477
2
# dynamic_cast
用于处理类的继承层次结构中的向下转型(将基类指针或引用转换为派生类指针或引用),并在运行时进行类型检查以确保转换的安全性。如果转换不合法,对于指针转换将返回 nullptr,对于引用转换将抛出 std::bad_cast 异常。
该特性要求类必须是多态的,因此至少包含有一个虚函数,以支持 RTTI,否则将触发编译错误 error: 'BaseClass' is not polymorphic
#include <iostream>

class Base {
    virtual void dummy() {
    }
};

class Derived : public Base {
};

int main(int, char*[]) {
    Base* p = new Derived();
    Derived* dptr = dynamic_cast<Derived*>(p);
    if (dptr) {
        std::cout << "cast success" << std::endl;
    } else {
        std::cout << "cast baded" << std::endl;
    }

    std::cout << typeid(dptr).name() << std::endl;

    delete p;
    return 0;
}
2
3
4
5
6
7
8
9
10
11
12
13
14
15
16
17
18
19
20
21
22
23
24
运行结果
cast success
P7Derived
2
# 类与对象
本质上就是将行为和属性组合在一起,表现实际生活中的事物。类的实例就是对象,即 Area area; 的 area 就是对象。
#include <iostream>
#define PI 3.14159265
using namespace std;

class Area {
public:
    float radius, width, height;

    double rectangular() {
        return width * height;
    };

    double circle() {
        return PI * (radius * radius);
    };
};

int main(const int argc, char** argv) {
    Area area;
    area.width = 5;
    area.height = 7;
    area.radius = 3.5;

    std::cout << "矩形面积:" << area.rectangular() << std::endl;
    std::cout << "圆形面积:" << area.circle() << std::endl;

    return 0;
}
2
3
4
5
6
7
8
9
10
11
12
13
14
15
16
17
18
19
20
21
22
23
24
25
26
27
28
运行结果
矩形面积:35
圆形面积:38.4845
2
# 与结构体的区别
struct 默认为公开权限,class 默认为私有权限
# 构造函数与析构函数
经典模型,不再赘述。在特殊情况下,也可以把构造函数变为 private,例如单例模式。构造函数为我们带来了不同的类初始化方法,例如使用括号(Human h1 = Human("", 19); 和 Human h1("", 19);)。 同时构造函数也可以重载
一个 C++ 类,如果用户不提供则默认会生成三个方法,无参构造函数,拷贝构造函数,析构函数。如果用户提供了无参构造函数,也C++ 依然会创建拷贝构造函数。
#include <iostream>
using namespace std;

class Human {
public:
    string name;

    Human(const string& name) {
        this->name = name;
        cout << "Human Init With Name " << name << endl;
    }

    Human() {
        cout << "Human Init" << endl;
    }

    ~Human() {
        cout << "Human Destruct" << endl;
    }
};

int main(const int argc, char** argv) {
    Human h;
    Human h1 = Human("123");
    Human h2 = Human(h1);
    h1.name = "hello111";
    std::cout << &h1 << " " << &h2 << " h2 name " << h2.name << std::endl;
    Human("456");

    return 0;
}
2
3
4
5
6
7
8
9
10
11
12
13
14
15
16
17
18
19
20
21
22
23
24
25
26
27
28
29
30
31
执行结果可见 h2 是 h1 的拷贝
Human Init
Human Init With Name 123
0x16fd2f280 0x16fd2f240 h2 name 123
Human Init With Name 456
Human Destruct
Human Destruct
Human Destruct
Human Destruct
2
3
4
5
6
7
8
# 深拷贝与浅拷贝
深拷贝是在堆中重新申请内存进行拷贝,浅拷贝是简单的赋值操作。
类的默认拷贝构造函数使用的就是浅拷贝,那么涉及指针的情况下浅拷贝将会出现问题,例如下面的代码 *h2.age 就是一个野指针( 未赋值NULL时,否则为空指针),因为 age 已经被释放了。
#include <iostream>
using namespace std;

class Human {
public:
    string name;
    int* age;

    ~Human() {
        delete age;
        age = NULL;
    }
};

int main(const int argc, char** argv) {
    Human h1;
    Human h2 = Human(h1);

    std::cout << *h2.age << std::endl;

    return 0;
}
2
3
4
5
6
7
8
9
10
11
12
13
14
15
16
17
18
19
20
21
22
运行结果
Process finished with exit code 139 (interrupted by signal 11:SIGSEGV)
或
[1] 49339 segmentation fault ./main
解决这个问题只需要自己实现深拷贝即可(必须也要实现构造函数,因为指针属性默认为空指针)
#include <iostream>
using namespace std;

class Human {
public:
    string name;
    int* age;

    Human(string name1, int age1) {
        name = name1;
        age = new int(age1);
    }

    Human(const Human& h) {
        age = new int(*h.age);
    }

    ~Human() {
        if (age != NULL) {
            delete age;
            age = NULL;
        }
    }
};

int main(const int argc, char** argv) {
    Human h1("", 19);
    Human h2 = Human(h1);

    std::cout << *h2.age << std::endl;

    return 0;
}
2
3
4
5
6
7
8
9
10
11
12
13
14
15
16
17
18
19
20
21
22
23
24
25
26
27
28
29
30
31
32
33
# 初始化列表
C++ 特有,用法类似函数默认值
#include <iostream>
using namespace std;

class Human {
public:
    string name;
    int* age;

    Human(): name("NAME"), age(new int(18)) {
    }

    // 用法2,给属性赋值
    Human(const string& name, const int age): name(name), age(new int(age)) {
    }
};

int main(const int argc, char** argv) {
    Human h1;
    std::cout << h1.name << std::endl;
    std::cout << *h1.age << std::endl;

    Human h2("sssss", 18);
    std::cout << h2.name << std::endl;
    std::cout << *h2.age << std::endl;

    return 0;
}
2
3
4
5
6
7
8
9
10
11
12
13
14
15
16
17
18
19
20
21
22
23
24
25
26
27
运行结果
NAME
18
sssss
18
2
3
4
# explicit 关键字
class Foo {
    int a;

public:
    explicit Foo(int a) : a(a) {
    }
};

int main(const int argc, char** argv) {
    Foo f = 1;
    Foo f1(1);

    return 0;
}
2
3
4
5
6
7
8
9
10
11
12
13
14
使用 explicit 修饰函数构造之后,构造函数就只能通过构造函数进行初始化。而不能通过类似 Foo f = 1 的形式。
# 访问权限
C++ 类支持三种权限 private、protected、public,分别是类内部可见,内部与子类可见,类内类外可见。经典模型,意义不在赘述。
#include <iostream>
using namespace std;

class Human {
private:
    string name;
    int age;
    int height;

public:
    string get_name() {
        return name;
    }

    int get_age() {
        return age;
    }

    int get_height() {
        return height;
    }

    void set_name(const string& name) {
        this->name = name;
    }

    void set_age(const int age) {
        if (age > 150) {
            return;
        }

        this->age = age;
    }

    void set_height(const int height) {
        this->height = height;
    }
};

int main(const int argc, char** argv) {
    Human h;
    h.set_name("Human");
    h.set_age(20);
    h.set_age(200);
    h.set_height(20);

    std::cout << h.get_name() << " " << h.get_age() << " " << h.get_height() << std::endl;

    return 0;
}
2
3
4
5
6
7
8
9
10
11
12
13
14
15
16
17
18
19
20
21
22
23
24
25
26
27
28
29
30
31
32
33
34
35
36
37
38
39
40
41
42
43
44
45
46
47
48
49
50
# 链式调用
使用 this 关键字实现,this 是类本身指针,返回 *this 即可返回自己。
#include <iostream>
using namespace std;

class Human {
    int age;

public:
    Human& set_age(int age) {
        this->age = age;
        return *this;
    }

    int get_age() {
        return this->age;
    }
};

int main(const int argc, char** argv) {
    Human h;
    h.set_age(10).set_age(20).set_age(30);
    std::cout << h.get_age() << std::endl;

    return 0;
}
2
3
4
5
6
7
8
9
10
11
12
13
14
15
16
17
18
19
20
21
22
23
24
运行结果
30
# 空指针访问成员
空指针也可以访问成员,但不能访问 this,因为没有 this
#include <iostream>
using namespace std;

class Human {
public:
    void hello() {
        std::cout << "hello" << std::endl;
    }
};

int main(const int argc, char** argv) {
    Human* h = NULL;
    h->hello();

    return 0;
}
2
3
4
5
6
7
8
9
10
11
12
13
14
15
16
# 常函数
方法后加上 const 声明为常函数,则不可以修改类内任何属性的值。原理是 this 的本质是 (Human* const this) 不能修改其指向,但可以修改其指向的类。常函数相当于使用 const 修饰了 this (const Human* const this) ,就既不可以修改值也不可以修改指向。如果希望属性能够被常函数修改,则需要使用 mutable 进行修饰。
#include <iostream>
using namespace std;

class Human {
    string name;
    mutable int age;

public:
    void hello() const {
        std::cout << "hello" << std::endl;
        // name = "hello"; // 报错
        age = 10;
    }

    void hello1() {
        std::cout << "hello1" << std::endl;
    }
};

int main(const int argc, char** argv) {
    Human h;
    h.hello();
    h.hello1();

    return 0;
}
2
3
4
5
6
7
8
9
10
11
12
13
14
15
16
17
18
19
20
21
22
23
24
25
26
# 常对象
const 修饰类类型获得的对象就是常对象,常对象只能调用常函数。
int main(const int argc, char** argv) {
    const Human h;
    h.hello();

    return 0;
}
2
3
4
5
6
常对象只能调用常函数
# constexpr
constexpr 是 C++11 标准中引入的一个关键字。用于声明常量表达式,表示这些表达式在编译时被计算,而不是在运行时。这意味着 constexpr 可以用于任何需要在编译时知道值的地方,例如数组的大小或模板参数。
例如数组长度
constexpr int size = 10;
int array[size];
2
如果一个函数被声明为 constexpr,则它的所有参数也要声明为 constexpr
constexpr int square(int number) {
    return number * number;
}

constexpr int x = square(10);
2
3
4
5
在类中使用
- 不能声明类为 constexpr,只能修饰其构造函数,且要求构造函数的函数体必须为空。
- 声明为 constexpr 时,构造函数在编译其就会初始化。因此,对象也必须声明为 constexpr
- 也可以修饰成员函数,但必须同时声明为常函数
class Rectangle {
    int _h, _w;
public:
    constexpr Rectangle(int h, int w) : _h(h), _w(w) {}
    constexpr int getArea() const { return _h * _w; }
};

constexpr Rectangle obj(10, 20);
2
3
4
5
6
7
8
在模板中使用
用法与类中一致,但因为模板的不确定性,它可能会在编译期被忽略
# 友元
使用 friend 关键字,让一些类或函数成为自己的朋友,让并让它们可以访问自己的 private 属性和方法。如果要声明友元函数,则朋友一定要先声明。
本例同时进行了类方法的外部实现,只要提前声明方法签名即可
#include <iostream>
using namespace std;

class BoyFriend;

class Friend {
    BoyFriend* bf = NULL;

public:
    Friend(BoyFriend* bf) {
        this->bf = bf;
    }

    string get_boyfriend_id() const;
    string get_bf_id() const;
};

class BoyFriend {
    // 友元类
    friend class GirlFriend;
    // 友元类成员函数
    friend string Friend::get_boyfriend_id() const;
    // 友元全局函数
    friend string get_bf_id(BoyFriend* bf);

private:
    string id;

public:
    BoyFriend(string id): id(id) {
    }

    string get_id();
};


class GirlFriend {
    BoyFriend* bf = NULL;

public:
    GirlFriend(BoyFriend* bf) {
        this->bf = bf;
    }

    string get_boyfriend_id() const;
};

string GirlFriend::get_boyfriend_id() const {
    return this->bf->id;
}

string Friend::get_boyfriend_id() const {
    return this->bf->id;
}

string Friend::get_bf_id() const {
    return "inaccess";
}

string BoyFriend::get_id() {
    return id;
}

string get_bf_id(BoyFriend* bf) {
    return bf->id;
}

int main(const int argc, char** argv) {
    BoyFriend bf("111222199905210000");
    GirlFriend gf(&bf);
    Friend f(&bf);

    std::cout << "bf id from self: " << bf.get_id() << std::endl;
    std::cout << "bf id from gf:" << gf.get_boyfriend_id() << std::endl;
    std::cout << "bf id from friend: " << f.get_boyfriend_id() << std::endl;
    std::cout << "bf id from func " << get_bf_id(&bf) << std::endl;

    return 0;
}
2
3
4
5
6
7
8
9
10
11
12
13
14
15
16
17
18
19
20
21
22
23
24
25
26
27
28
29
30
31
32
33
34
35
36
37
38
39
40
41
42
43
44
45
46
47
48
49
50
51
52
53
54
55
56
57
58
59
60
61
62
63
64
65
66
67
68
69
70
71
72
73
74
75
76
77
78
79
运行结果
bf id from self: 111222199905210000
bf id from gf:111222199905210000
bf id from friend: 111222199905210000
bf id from func 111222199905210000
2
3
4
# 运算符重载
可以对类进行 +、-、*、/、>、<、>=、<=、==、++、--、>>、<<、() 运算的重载,有全局函数和成员函数两种形式,下面列出几种实现和未实现的签名。
() 重载是一个重要的功能,因为其调用方式类似函数,所以也称为仿函数。这一概念在 STL 中会着重提及
#include <iostream>
using namespace std;

class BoyFriend {
public:
    string id;
    int age;

    BoyFriend(string id, int age): id(id), age(age) {
    }

    // 通过成员函数重载运算符
    BoyFriend operator +(BoyFriend& bf) const {
        BoyFriend temp(id, age);
        temp.age = age + bf.age;

        return temp;
    }

    bool operator ==(BoyFriend& bf) const {
        return bf.id == id;
    }

    BoyFriend& operator++() {
        age++;
        return *this;
    }

    BoyFriend operator++(int) {
        BoyFriend temp = *this;
        age++;
        return temp;
    }

    /**
    * b - b2;
    * b * b2;
    * b / b2;
    * b >= b2;
    * b <= b2;
    * b--;
    * b(1);
     */
    BoyFriend operator-(const BoyFriend&) const;
    BoyFriend operator*(const BoyFriend&) const;
    BoyFriend operator/(const BoyFriend&) const;
    bool operator>=(const BoyFriend&) const;
    bool operator<=(const BoyFriend&) const;
    BoyFriend operator--(int);
    BoyFriend operator()(int) const;
};

bool operator<(BoyFriend&, BoyFriend&);
// 通过全局函数重载运算符
bool operator >(BoyFriend& bf1, BoyFriend& bf) {
    return bf1.age > bf.age;
}

int main(const int argc, char** argv) {
    BoyFriend b("100", 10);
    BoyFriend b2("100", 16);

    std::cout << "重载 == : " << (b == b2) << std::endl;
    std::cout << "重载 +  : " << (b + b2).age << std::endl;
    std::cout << "重载 >  : " << (b > b2) << std::endl;
    b++;
    ++b;
    std::cout << "重载 ++  : " << b.age << std::endl;

    return 0;
}
2
3
4
5
6
7
8
9
10
11
12
13
14
15
16
17
18
19
20
21
22
23
24
25
26
27
28
29
30
31
32
33
34
35
36
37
38
39
40
41
42
43
44
45
46
47
48
49
50
51
52
53
54
55
56
57
58
59
60
61
62
63
64
65
66
67
68
69
70
71
执行结果
重载 == : 1
重载 +  : 26
重载 >  : 0
重载 ++  : 12
2
3
4
# 左移右移运算符重载
C++ 中左移右移运算符比较特殊,实际上的功能类似管道输入输出。利用这个特性可以很方便的实现 go 中的 Stringer interface
#include <iostream>

using namespace std;

class Foo {
    friend ostream& operator<<(ostream&, Foo&);
    friend istream& operator>>(istream&, Foo&);

public:
    Foo(int x, string name): x(x), name(name) {
    }

private:
    int x;
    string name;
};

ostream& operator<<(ostream& out, Foo& foo) {
    cout << "name: " << foo.name << endl;
    cout << "x: " << foo.x << endl;
    return out;
}

istream& operator>>(istream& in, Foo& foo) {
    string temp;
    in >> temp;
    foo.name += "-";
    foo.name += temp;
    return in;
}

int main(const int argc, char** argv) {
    Foo f(1, "Alex");

    std::cin >> f;
    std::cout << f << std::endl;

    return 0;
}
2
3
4
5
6
7
8
9
10
11
12
13
14
15
16
17
18
19
20
21
22
23
24
25
26
27
28
29
30
31
32
33
34
35
36
37
38
39
运行结果
input-from-command-line
name: Alex-input-from-command-line
x: 1
2
3
# 持有引用与指针的区别
持有指针和引用都不会拥有该对象的所有权,但也有几点区别。
- 持有指针时对象不拥有持有的指针指向的对象,只是保存了一个指向它的指针,因此要确保生命周期内指针所指向的对象仍然有效,否则将变为悬空指针。
- 持有应用时对象不拥有所引用的对象,因此要确保生命周期内引用的对象仍然有效,否则将出现悬空引用。
- 引用虽然不持有对象的,但与引用的对象实现了强绑定,所以不能在运行时更换引用的对象。且引用必须指向一个有效的对象,否则将无法初始化。
- 指针不持有对象,并且也没有绑定关系。因此可以在运行时更换指向的对象,并且无需有效对象即可使用 nullptr 初始化。
- 指针需要占用一个指针的空间,并且在使用时需要先进行一次或几次寻址。
- 引用本身是引用对象的别名,所以不占空间,只需要一次寻址。
- 引用更安全,因为它总是指向有效的对象,虽然有效性需要通过持有引用所有权的对象进行保障。
使用场景:
如果可以确保所引用的对象在引用的生命周期内保持有效,并且希望代码更简洁易懂,则可以使用引用。而在处理动态内存分配、数据结构以及需要更灵活的对象引用时,指针则可能更加合适。
#include <iostream>
#include <string>

class A {
public:
    std::string name;

    explicit A(const std::string& name) : name(name) {
    }
};

class holdPtr {
    A* a;

public:
    explicit holdPtr(A* a): a(a) {
        std::cout << a->name << " through pointer" << std::endl;
    }
};

class holdRef {
    A& a;

public:
    explicit holdRef(A& a): a(a) {
        std::cout << a.name << " through reference" << std::endl;
    }
};

int main() {
    A a("object A");

    holdPtr p(&a);
    holdRef r(a);
}
2
3
4
5
6
7
8
9
10
11
12
13
14
15
16
17
18
19
20
21
22
23
24
25
26
27
28
29
30
31
32
33
34
35
运行结果
object A through pointer
object A through reference
2
# 异常处理
C++ 支持 throw, try catch 式的异常处理流程,也支持重写 std::exception 实现自定义异常类。同时和其他语言一样,在捕获 std::
exception 时其所有子类抛出的异常也可以同时被捕获,另外可以使用
catch (...) 捕获所有未知异常。
#include <iostream>
using namespace std;

class Exception : public std::exception {
public:
    const char* what() const throw() {
        return "Custom Exception";
    }
};

int main(int argc, char* argv[]) {
    try {
        throw Exception();
    } catch (const Exception& e) {
        std::cerr << "catch Exception: " << e.what() << std::endl;
    } catch (...) {
        std::cerr << "unkwon Exception" << std::endl;
    }

    try {
        throw Exception();
    } catch (const std::exception& e) {
        std::cerr << "catch std::exception: " << e.what() << std::endl;
    } catch (...) {
        std::cerr << "unkwon Exception" << std::endl;
    }

    try {
        throw Exception();
    } catch (...) {
        std::cerr << "unkwon Exception" << std::endl;
    }

    return 0;
}
2
3
4
5
6
7
8
9
10
11
12
13
14
15
16
17
18
19
20
21
22
23
24
25
26
27
28
29
30
31
32
33
34
35
运行结果
catch Exception: Custom Exception
catch std::exception: Custom Exception
unkwon Exception
2
3
# noexcept 关键字
使用 noexcept 表示函数在执行过程中不会抛出任何异常。以便编译器做出一些优化,例如避免额外的堆栈操作和异常处理代码,从而提高代码的执行效率。
特点
- 如果 noexcept 函数内部抛出了异常,则程序会直接调用 std::terminate() 终止执行,而不会像通常那样寻找一个catch块来处理异常
- noexcept 也可以用于类方法
#include <iostream>
using namespace std;

int foo() noexcept {
    throw std::exception();
}

int bar() {
    throw std::exception();
}

int main(int argc, char* argv[]) {
    try {
        bar();
    } catch (const std::exception& e) {
        std::cout << e.what() << ", from bar" << std::endl;
    }

    try {
        foo();
    } catch (const std::exception& e) {
        std::cout << e.what() << ", from foo and noexcept" << std::endl;
    }

    return 0;
}
2
3
4
5
6
7
8
9
10
11
12
13
14
15
16
17
18
19
20
21
22
23
24
25
26
编译结果,如果不声明为 noexcept,则不会有此编译警告
[1/2] Building CXX object CMakeFiles/playground.dir/main.cpp.o
main.cpp:5:5: warning: 'foo' has a non-throwing exception specification but can still throw [-Wexceptions]
    throw std::exception();
    ^
main.cpp:4:5: note: function declared non-throwing here
int foo() noexcept {
    ^     ~~~~~~~~
1 warning generated.
[2/2] Linking CXX executable playground
2
3
4
5
6
7
8
9
运行结果
std::exception, from bar
libc++abi: terminating due to uncaught exception of type std::exception: std::exception

Process finished with exit code 134 (interrupted by signal 6:SIGABRT)
2
3
4
# 面向对象
面向对象语言具有三大特性:封装、继承、多态
# 封装
本质上就是将行为和属性组合在一起,表现实际生活中的事物。并允许为属性和行为加以权限控制。
# 继承
经典概念,展示用法
#include <iostream>
using namespace std;

class Parent {
public:
    string name; // 任何人都可以访问名字

protected:
    int moneyUSD = 100; // 孩子们可以访问余额
    int moneyCNY = 1000; // 孩子们可以访问余额

private:
    int privateMoney = 5; // 无法访问私房钱
};

class Son : Parent {
protected:
    int moneyCNY = 10;

public:
    string get_parent_name() {
        return name;
    }

    int get_money() const {
        return moneyCNY;
    }

    int get_parent_moneyUSD() const {
        // 同名时,可以直接用 父类名称::属性名 访问有权限的父类属性或方法。
        return Parent::moneyUSD;
    }

    int get_parent_moneyCNY() const {
        return moneyCNY;
    }
};

int main(const int argc, char** argv) {
    Son son;
    std::cout << son.get_parent_name() << std::endl;
    std::cout << son.get_money() << std::endl;
    std::cout << son.get_parent_moneyUSD() << std::endl;
    std::cout << son.get_parent_moneyCNY() << std::endl;

    return 0;
}
2
3
4
5
6
7
8
9
10
11
12
13
14
15
16
17
18
19
20
21
22
23
24
25
26
27
28
29
30
31
32
33
34
35
36
37
38
39
40
41
42
43
44
45
46
47
运行结果
10
100
10
2
3
4
特殊用法,继承时将父类中的 public 属性在自己这里变为 protected 或 private,保护该属性在向下继承时的权限。
class Son : protected Parent
class Son : private Parent
2
多继承,实际开发中不建议使用
class Lvbu: Son, protected Son2, private Son3
# override
- 编译时检查:当使用override关键字时,编译器会检查你声明的函数是否确实重写了基类中的某个虚函数。如果基类中没有相应的虚函数被重写,或者签名匹配,编译器将报错。这可以避免一些运行时错误,提高代码的健壮性和可维护性。
- 提高代码可读性:override关键字清晰地表明了代码的意图,即这个成员函数是重写基类中的虚函数。
- 避免误覆盖隐藏(Name Hiding):如果派生类中的函数名与基类中的某个函数名相同,但参数列表不同,那么这会导致函数隐藏(而不是重写)。使用override关键字可以避免这种情况,因为编译器会检查是否真的存在需要被重写的虚函数。
- override 是“显式优于隐式”原则的一个体现
#pragma once

class Foo final : public Bar {
public:
    void run() override;
};
2
3
4
5
6
# final 关键字
类名后增加 final 关键字,意味着该类不可再被继承。如果继承将会引发类似 Cannot inherit from 'final' class 'Foo' 错误。
#pragma once

class Foo final : public Bar {
public:
    void run() override;
};

class Foo1 : public Foo {
};
2
3
4
5
6
7
8
9
编译结果
foo.h:13:31: error: base 'Foo' is marked 'final'
class Foo1 : public Foo {
                              ^
foo.h:5:7: note: 'Foo' declared here
class Foo final : public Bar {
      ^             ~~~~~
1 error generated.
2
3
4
5
6
7
# 菱形继承
指一个类派生了两个类,又被同一个类所继承。这样的继承有很多问题,应当避免。
- 在使用最上层类的数据时,因为中间的多次继承产生二义性
- 数据被继承多次,实际上只需要其中一份

# 多态
在面向对象编程中,多态是一个核心概念,它允许我们以统一的方式处理不同类型的对象。多态的实现依赖于两种关键的绑定机制:地址早绑定(也称为静态绑定、静态多态)和地址晚绑定(也称为动态绑定、动态多态)。
- 地址早绑定(静态多态)
在编译阶段,编译器就已经确定了函数调用的具体地址。这意味着,即使子类重写了父类中的某个方法,如果在编译时就已经确定了调用的版本(如通过函数重载或运算符重载),那么运行时将始终调用这个固定版本的函数,而不会根据对象的实际类型进行动态选择。前面提到的函数重载和运算符重载都属于静态多态。
- 地址晚绑定(动态多态)
与早绑定相反,晚绑定允许在程序运行时根据对象的实际类型来确定调用哪个版本的函数。这种机制是实现多态性的关键,它确保了当我们通过父类引用或指针调用一个方法时,如果该方法在子类中被重写,那么将调用子类中的版本。
# 动态多态与虚函数
动态多态是面向对象编程中一个强大的特性,它基于一个基本原则:子类类型是对父类类型的扩展和具体化。因此,当我们通过父类类型的引用或指针来操作一个对象时,如果该对象实际上是某个子类的实例,我们期望能够调用到该子类特有的方法实现。
为了实现这种动态多态,C++ 引入了虚函数的概念。通过在函数声明前加上
virtual 关键字,我们告诉编译器该函数是可被重写的,并且其调用应该在运行时根据对象的实际类型来确定。这样,即使我们在编译时只知道父类类型的引用或指针,程序也能在运行时根据对象的实际类型来调用相应的方法,从而实现了多态性。
总结来说,虚函数是C++中实现动态多态的关键机制,它允许我们在运行时根据对象的实际类型来确定调用的函数版本,从而增强了程序的灵活性和可扩展性。
#include <iostream>
using namespace std;

class Animal {
public:
    void say() {
        std::cout << "Say From Animal!" << endl;
    }

    virtual void shout() {
        cout << "Shout From Animal!" << endl;
    }
};

class Dog : public Animal {
public:
    void say() {
        std::cout << "Say From Dog!" << endl;
    }

    void shout() {
        cout << "Shout From Dog!" << endl;
    }
};

class Cat : public Animal {
public:
    void say() {
        std::cout << "Say From Cat!" << endl;
    }

    void shout() {
        cout << "Shout From Cat!" << endl;
    }
};

void animal_ptr_say(Animal* animal) {
    animal->say();
    animal->shout();
}

void animal_ref_say(Animal& animal) {
    animal.say();
    animal.shout();
}

int main(const int argc, char** argv) {
    Dog d = Dog();
    Cat c = Cat();
    c.say();
    c.shout();
    d.say();
    d.shout();

    std::cout << std::endl;
    animal_ptr_say(&d);
    animal_ptr_say(&c);

    std::cout << std::endl;
    animal_ref_say(d);
    animal_ref_say(c);

    return 0;
}
2
3
4
5
6
7
8
9
10
11
12
13
14
15
16
17
18
19
20
21
22
23
24
25
26
27
28
29
30
31
32
33
34
35
36
37
38
39
40
41
42
43
44
45
46
47
48
49
50
51
52
53
54
55
56
57
58
59
60
61
62
63
64
运行结果
Say From Cat!
Shout From Cat!
Say From Dog!
Shout From Dog!

Say From Animal!
Shout From Dog!
Say From Animal!
Shout From Cat!

Say From Animal!
Shout From Dog!
Say From Animal!
Shout From Cat!
2
3
4
5
6
7
8
9
10
11
12
13
14
# 纯虚函数与抽象类
纯虚函数与普通虚函数的区别是,纯虚函数没有实现,直接使用 = 0 占位。
C++ 没有接口(interface),使用抽象类实现接口的功能。抽象类不需要像其他语言使用关键字声明,只要类中有纯虚函数类就自动成为抽象类,抽象类有两个特点。实现纯虚函数时,签名也可以加 virtual。
- 抽象类无法实力化为对象
- 子类必须实现抽象类的虚函数,否则自己也将成为一个抽象类
#include <iostream>
using namespace std;

class Animal {
public:
    virtual void shout() = 0;
};

class Cat : Animal {
};

class Targer : Cat {
public:
    void shout() {
        cout << "Shout From Targer!" << endl;
    }
};

int main(const int argc, char** argv) {
    Targer d = Targer();
    d.shout();

    return 0;
}
2
3
4
5
6
7
8
9
10
11
12
13
14
15
16
17
18
19
20
21
22
23
24
# 虚析构与纯虚析构
虚析构解决子类释放时只调用父类析构的问题,如果析构函数为虚析构,则释放时会自动链式调用子类和自己的析构。
纯虚析构一样可以解决这个问题,但它一定要手动实现,不能被子类实现。区别是如果使用纯虚析构,则类自动变为抽象类。
# 普通析构
#include <iostream>
using namespace std;

class Animal {
public:
    ~Animal() {
        std::cout << "Animal Deleted" << std::endl;
    }
};

class Targer : public Animal {
public:
    ~Targer() {
        std::cout << "Targer Deleted" << std::endl;
    }
};

int main(const int argc, char** argv) {
    Animal* d = new Targer;
    delete d;

    return 0;
}
2
3
4
5
6
7
8
9
10
11
12
13
14
15
16
17
18
19
20
21
22
23
执行结果
Animal Deleted
# 虚析构
在析构函数前加 virtual 即可
virtual ~Animal() {
    std::cout << "Animal Deleted" << std::endl;
}
2
3
执行结果
Targer Deleted
Animal Deleted
2
# 纯虚析构
#include <iostream>
using namespace std;

class Animal {
public:
    virtual ~Animal() = 0;
};

Animal::~Animal() {
    std::cout << "Animal Deleted" << std::endl;
}

class Targer : public Animal {
public:
    ~Targer() {
        std::cout << "Targer Deleted" << std::endl;
    }
};

int main(const int argc, char** argv) {
    Animal* d = new Targer;
    delete d;

    return 0;
}
2
3
4
5
6
7
8
9
10
11
12
13
14
15
16
17
18
19
20
21
22
23
24
25
执行结果
Targer Deleted
Animal Deleted
2
# 面向对象六大原则
程序实现前五个原则,即可称之为满足了 SOLID 原则。
- 单一职责原则 SRP
首先应该符合封装特性,其次对于一个类而言,应该仅有一个引起它变化的原因。
比如一个类中有两个方法,修改方法1会导致方法2无法工作,那么这个设计就不符合 SRP 原则。需要将方法2单独拆分为一个类。
符合SRP之后代码的可读性和维护行都会得到极大提升,由于SRP 的一般实践是一个类只有一个方,所以它也会带来管理上的困难。
- 开闭原则 OCP
软件应该对扩展开放,对修改关闭。简而言之就是修改功能时我们应该对代码进行扩展,而不是修改。
- 里氏替换原则 LSP
所有引用基类的地方都能透明的使用其子类对象。
LSP 是一个重要的原则,主要解决了继承特性的一些问题,例如随机修改成员的安全问题、子类重写父类方法之后其他子类出现异常。其本质是对于继承特性的一种通用规范。
规范如下:
- 子类可以实现父类的抽象方法,但是不能覆盖父类的非抽象方法。
- 子类可以增加自己独有的方法。
- 当子类的方法重载父类的方法时候,方法的形参要比父类的方法的输入参数更加宽松。
- 当子类的方法实现父类的抽象方法时,方法的返回值要比父类更严格。
可以理解为,子类只能扩展父类的功能,不能改变父类原有的功能。
- 依赖倒置原则 DIP
高层模块不应该依赖于低层模块,而是应该依赖于抽象。其实就是面向接口编程,Java 中比较常见,C++ 使用抽象类实现。
#include <iostream>

class Worker {
public:
    virtual ~Worker() = default;
    virtual void run() = 0; // 必须是纯虚函数,才能成为抽象类,即其他语言的 interface
};

class Worker1 final : public Worker {
public:
    void run() override {
        std::cout << "Worker 1 run" << std::endl;
    }
};

class Worker2 final : public Worker {
public:
    void run() override {
        std::cout << "Worker 2 run" << std::endl;
    }
};

class Foo {
    // 必须使用指针或引用才能引用抽象类型,因为抽象类不能实现
    // 类似 go 语言的 interface 类型的实参一定是引用类型
    // Worker& worker; // 引用形式
    Worker* worker;

public:
    Foo(Worker* w): worker(w) {
    }

    void run() {
        worker->run();
    }
};

int main(const int argc, char** argv) {
    // 直接
    Worker* w1 = new Worker1();
    Worker* w2 = new Worker2();
    // 使用自己的类型也可以
    // Worker1* w1 = new Worker1();
    // Worker2* w2 = new Worker2();
    Foo(w1).run();
    Foo(w2).run();
    delete w1;
    delete w2;

    Worker1 ww1 = {};
    Worker2 ww2 = {};
    Foo(&ww1).run();
    Foo(&ww2).run();

    return 0;
}
2
3
4
5
6
7
8
9
10
11
12
13
14
15
16
17
18
19
20
21
22
23
24
25
26
27
28
29
30
31
32
33
34
35
36
37
38
39
40
41
42
43
44
45
46
47
48
49
50
51
52
53
54
55
56
运行结果
Worker 1 run
Worker 2 run
Worker 1 run
Worker 2 run
2
3
4
- 接口隔离原则 ISP
客户端不应该依赖他不需要的接口。
在 C++ 中如果一个类实现了抽象类,那就必须实现它的所有纯虚方法,否则它将仍然是一个抽象类。但实现类可能不需要实现其中的所有方法即可满足功能,这种情况意味着设计不合理和需要拆分抽象类,形成最小依赖抽象类。
- 迪米特原则 LOD
一个对象应该对其他对象保持最小的了解。
这个原则希望实现程序设计神话:低耦合。方法是只与最直接的朋友通信,C++ 的友元可以很好的解释什么是朋友关系。
简单的例子:去餐馆吃饭,不需要了解老板从哪里获得食材及如何进行制作,你只需要等待片刻享用菜品即可。
# 泛型
泛型就是类型参数化,C++ 使用模板实现泛型,有几种实现方式。
# 函数模板
函数模板支持类型自动推导
#include <iostream>
using namespace std;

template <class T> // 等效 template <typename T>,没有任何区别
T add(T a, T b) {
    return a + b;
}

int main(const int argc, char** argv) {
    std::cout << add(1, 2) << std::endl;
    std::cout << add(1.1111, 2.0213) << std::endl;
    std::cout << add<int>(1.111, 2.1) << std::endl;

    return 0;
}
2
3
4
5
6
7
8
9
10
11
12
13
14
15
因为我们强制为小数设置了 int 类型,因此现代化的编译器编译可能出现警告,但并不影响运行。
/bin/cmake --build /code/playground/cmake-build-debug --target all -j 8
[2/5] Building CXX object CMakeFiles/playground.dir/main.cpp.o
/code/playground/main.cpp:12:34: warning: implicit conversion from 'double' to 'int' changes value from 2.1 to 2 [-Wliteral-conversion]
    std::cout << add<int>(1.111, 2.1) << std::endl;
                 ~~~             ^~~
/code/playground/main.cpp:12:27: warning: implicit conversion from 'double' to 'int' changes value from 1.111 to 1 [-Wliteral-conversion]
    std::cout << add<int>(1.111, 2.1) << std::endl;
                 ~~~      ^~~~~
2 warnings generated.
[5/5] Linking CXX executable playground
2
3
4
5
6
7
8
9
10
运行结果
3
3.1324
3
2
3
特殊情况
当泛型函数重载时,类型自动推导机制会选择最匹配的,没有最匹配的优先选择全局函数。
#include <iostream>
using namespace std;

template <class T = int>
T get(T a) {
    std::cout << "T" << std::endl;
    return a;
}

double get(double a) {
    std::cout << "get" << std::endl;
    return a;
}

int main(const int argc, char** argv) {
    std::cout << get(100) << std::endl;;
    std::cout << get(10.000) << std::endl;;

    return 0;
}
2
3
4
5
6
7
8
9
10
11
12
13
14
15
16
17
18
19
20
运行结果
T
100
get
10
2
3
4
# 类模板
#include <iostream>
using namespace std;

template <class TName, class TAge>
class Person {
    TName name;
    TAge age;

public:
    Person(TName name, TAge age) : name(name), age(age) {
    }
};

int main(const int argc, char** argv) {
    Person<string, int> p("Alex", 100);

    return 0;
}
2
3
4
5
6
7
8
9
10
11
12
13
14
15
16
17
18
# 类模版的继承
类模板同样支持继承,但必须显式指定父类的泛型类型,实例化子类时不再需要泛型,因为该类已经不再是模板类。
让子类也成为模板,可以解决父类泛型类型不明确和泛型继承的问题。
#include <iostream>
using namespace std;

template <class T>
class Person {
    T name;

public:
    Person(T name) : name(name) {
    }
};

class Boy : Person<string> {
};

template <class T>
class Girl : Person<T> {
};

int main(const int argc, char** argv) {
    Person<string> p("Alex");

    Boy b();
    Girl<string> g();

    return 0;
}
2
3
4
5
6
7
8
9
10
11
12
13
14
15
16
17
18
19
20
21
22
23
24
25
26
27
# 类模版的成员方法类外实现
当类模板在类外实现时,需要再次指定 template 和显式指定类的泛型参数为 template,此时不再支持类型的默认参数,也不支持使用实际类型取代泛型。
#include <iostream>
using namespace std;

template <class T>
class Person {
    T name;

public:
    Person(T name);
};

template <class T>
Person<T>::Person(T name) {
    this->name = name;
}

int main(const int argc, char** argv) {
    Person<string> p("Alex");

    return 0;
}
2
3
4
5
6
7
8
9
10
11
12
13
14
15
16
17
18
19
20
21
# 模板方法的创建时机
模版方法创建于运行期而非编译期,因为编译器无法确认模板具体类型。因此如果类模板与实现不在同一个文件中,且只导入头文件时,运行时将无法得知模板方法的实现在哪里,不过好在这个问题在编译期就会暴露,而不是在运行时暴雷。
这里引入了一个新语法,即 Hero() = default;
,目的是让编译器默认实现该构造函数。需要它的原因是我们实现有参构造函数的同时无参构造函数被自动覆盖,但我们依然希望保留无参构造函数。
hero.h
#pragma once

template <class T>
class Hero {
    T name;

public:
    Hero() = default;

    Hero(T name) : name(name) {
    }

    T GetName();
};
2
3
4
5
6
7
8
9
10
11
12
13
14
hero.cpp
#include "hero.h"
#include <iostream>

template <class T>
T Hero<T>::GetName() {
    return name;
}
2
3
4
5
6
7
main.cpp
#include <iostream>

#include "hero.h"
using namespace std;

int main(const int argc, char** argv) {
    Hero<string> h;
    h.GetName();

    return 0;
}
2
3
4
5
6
7
8
9
10
11
编译失败错误提示可见,无法找到内容 GetName() 这个符号。
====================[ Build | playground | Debug ]==============================
/bin/cmake --build /code/playground/cmake-build-debug --target playground -j 8
[3/3] Linking CXX executable playground
FAILED: playground
: && /usr/bin/c++ -g -arch arm64 -isysroot /SDKs/MacOSX14.5.sdk -mmacosx-version-min=14.4 -Wl,-search_paths_first -Wl,-headerpad_max_install_names  CMakeFiles/playground.dir/main.cpp.o CMakeFiles/playground.dir/src/hero.cpp.o -o playground   && :
Undefined symbols for architecture arm64:
  "Hero<std::__1::basic_string<char, std::__1::char_traits<char>, std::__1::allocator<char>>>::GetName()", referenced from:
      _main in main.cpp.o
ld: symbol(s) not found for architecture arm64
clang: error: linker command failed with exit code 1 (use -v to see invocation)
ninja: build stopped: subcommand failed.
2
3
4
5
6
7
8
9
10
11
# hpp 文件
为了解决刚才问题,C++ 引入了 hpp 文件机制。
hpp:Header plus plus的缩写,本质是将 .cpp 的实现代码混入 .h 头文件,即声明与定义(实现)都包含在同一个文件中。使用时只需要 include 该 hpp 文件即可。
同时 hpp 有一个好处可以大幅度减少cpp文件数与编译次数。
hero.hpp
#pragma once

template <class T>
class Hero {
    T name;

public:
    Hero(T name) : name(name) {
    }

    T GetName();
};

template <class T>
T Hero<T>::GetName() {
    return name;
}
2
3
4
5
6
7
8
9
10
11
12
13
14
15
16
17
main.cpp
#include <iostream>

#include "hero.hpp"
using namespace std;

int main(const int argc, char** argv) {
    Hero<string> h("Alex");
    std::cout << h.GetName() << std::endl;

    return 0;
}
2
3
4
5
6
7
8
9
10
11
运行结果
Alex
# 泛型的默认值
泛型本质上是类型的参数化,自然也可以有默认值,但是要使用 <> 占位
函数模板不需要占位
#include <iostream>
using namespace std;

template <class T = int>
T get(T a) {
    std::cout << "T" << std::endl;
    return a;
}

template <class TName = string>
class Person {
    TName name;

public:
    Person(TName name) : name(name) {
    }
};

int main(const int argc, char** argv) {
    Person<> p("Alex");
    std::cout << get(100) << std::endl;;

    return 0;
}
2
3
4
5
6
7
8
9
10
11
12
13
14
15
16
17
18
19
20
21
22
23
24
# 标准库
就是 c++ 默认实现的功能,以文件流为例
#include <fstream>
#include <iostream>
using namespace std;

int main(const int argc, char** argv) {
    fstream fs;
    fs.open("test.txt", ios::out | ios::trunc);

    for (int i = 0; i < 10; ++i) {
        fs << "Hello " << i << endl;
    }

    fs.close();
    std::cout << "写入完成" << std::endl;

    fs.open("test.txt", ios::in);
    if (!fs.is_open()) {
        std::cerr << "Error opening file" << endl;
        return 1;
    }

	// 使用数组 buf 读取
    // char buf[1024] = {0};
    // while (fs.getline(buf, 1024)) {
    //     std::cout << buf;
    // }

	// 使用字符串读取
    string sbuf;
    while (std::getline(fs, sbuf)) {
        std::cout << sbuf << std::endl;
    }

    return 0;
}
2
3
4
5
6
7
8
9
10
11
12
13
14
15
16
17
18
19
20
21
22
23
24
25
26
27
28
29
30
31
32
33
34
35
执行结果
写入完成
Hello 0
Hello 1
Hello 2
Hello 3
Hello 4
Hello 5
Hello 6
Hello 7
Hello 8
Hello 9
2
3
4
5
6
7
8
9
10
11
把 mode 改为 ios::binary,则可以使用 read write 接口,进行传统的二进制读写模式。
fstream fs;
fs.open("test.txt", ios::binary | ios::trunc);

fs.write("hello world", 12);

char buf[1024] = {0};
fs.read(buf, 1024);
2
3
4
5
6
7
# STL
STL:C++ 标准模板库(Standard Template Library),汇聚了一系列高度灵活且功能丰富的模板类和函数。精髓在于其能够利用模板机制,构建出与数据类型无关的算法和数据结构,这一特性极大地拓宽了C++语言的应用边界。
- 容器(Containers)
它存储数据元素的框架,如向量(vector)、列表(list)、集合(set)等
- 迭代器(Iterators)
提供统一的方式遍历容器元素,无需关心容器的实现细节,实现算法与数据结构解耦。
- 算法(Algorithms)
遵循“策略模式”设计的一系列通用操作序列,如排序、搜索、变换等,通过迭代器作用于容器上实现数据处理。
- 函数对象(Function Objects)也称为仿函数(Functors)
通过重载操作符(),使得对象能够像函数一样被调用。在STL中,函数对象常被用作算法的参数,以自定义算法的行为。
- 适配器(Adapters)
适配器是一种设计模式的应用,在STL中,它们通过封装和转换已有的容器或迭代器,创造出新的容器或迭代器类型,从而在不改变原有结构的基础上,扩展了其功能。
# vector(向量)
构建了一个与类型无关的可迭代容器,功能类似其他语言里的元组和切片,以下展示了其用法和三种迭代方法。
如果没有使用 auto ints = std::vector<int>(200) 声明,是不能直接使用中括号赋值的 ints[1] = 100
,因为数组未经初始化,[1] 这个元素根本不存在。
#include <iostream>
#include <vector>

using namespace std;

class Foo {
    friend ostream& operator<<(ostream& out, Foo f);

public:
    Foo(int x): x(x) {
    }

private:
    int x;
};

ostream& operator<<(ostream& out, const Foo f) {
    return out << f.x;
}

void callback(const Foo f) {
    std::cout << f << std::endl;
}

int main(const int argc, char** argv) {
    vector<Foo> v;

    for (int i = 0; i < 3; i++) {
        v.push_back(Foo(i));
    }

    vector<Foo>::iterator begin = v.begin();
    vector<Foo>::iterator end = v.end();

    for (vector<Foo>::iterator it = begin; it != end; ++it) {
        std::cout << *it << std::endl;
    }

    std::cout << "reset1" << std::endl;

    for_each(begin, end, callback);

    std::cout << "reset2" << std::endl;
    while (begin != end) {
        std::cout << *begin << std::endl;
        begin++;
    }

    return 0;
}
2
3
4
5
6
7
8
9
10
11
12
13
14
15
16
17
18
19
20
21
22
23
24
25
26
27
28
29
30
31
32
33
34
35
36
37
38
39
40
41
42
43
44
45
46
47
48
49
50
运行结果
0
1
2
reset1
0
1
2
reset2
0
1
2
2
3
4
5
6
7
8
9
10
11
# list(列表)
和 vector 用法几乎一样,但是这里展示了一种新的用法,list 重载了 = 运算符因此可以像使用数组一样用 = {} 赋值,当然 vector 也可以。
二者的区别在于
- vector 实现类似数组,连续的内存空间可以实现高效的读取
- list 使用链表实现,可以实现高效的插入
- 二者都可以进行 insert 操作,但是 list 支持向最前插入(push_front)
因此在需要高效插入的情况下使用 list,需要高效读取的情况下则使用 vector。假设有一个巨大的列表需要序列化本地保存,为了最大程度的利用性能则可以在写入时使用 list,读取时使用 vector。
#include <iostream>
#include <list>

using namespace std;

class Foo {
    friend ostream& operator<<(ostream& out, Foo f);

public:
    Foo(int x): x(x) {
    }

private:
    int x;
};

ostream& operator<<(ostream& out, const Foo f) {
    return out << f.x;
}

void callback(const Foo f) {
    std::cout << f << std::endl;
}

int main(const int argc, char** argv) {
    list<Foo> l = {
        Foo(2),
        Foo(3),
        Foo(4),
    };

    list<Foo>::iterator begin = l.begin();
    list<Foo>::iterator end = l.end();

    for (list<Foo>::iterator it = begin; it != end; ++it) {
        std::cout << *it << std::endl;
    }

    std::cout << "reset1" << std::endl;

    for_each(begin, end, callback);

    std::cout << "reset2" << std::endl;
    while (begin != end) {
        std::cout << *begin << std::endl;
        begin++;
    }

    return 0;
}
2
3
4
5
6
7
8
9
10
11
12
13
14
15
16
17
18
19
20
21
22
23
24
25
26
27
28
29
30
31
32
33
34
35
36
37
38
39
40
41
42
43
44
45
46
47
48
49
50
执行结果
2
3
4
reset1
2
3
4
reset2
2
3
4
2
3
4
5
6
7
8
9
10
11
# deque
deque 本质就是可以进行前插的 vector,原理是内部调度器自动维护了一个元素类型是 vector 的 vector,默认游标在这个 vector 的中间,前插就往前面的元素中插入,反之亦然。遍历和随机读取的效率不如 vector 但是比 list 好。
deque 支持使用 sort() 进行排序
#include <deque>
#include <iostream>

using namespace std;

class Foo {
    friend ostream& operator<<(ostream& out, Foo f);

public:
    Foo(int x): x(x) {
    }

private:
    int x;
};

ostream& operator<<(ostream& out, const Foo f) {
    return out << f.x;
}

void callback(const Foo f) {
    std::cout << f << std::endl;
}

int main(const int argc, char** argv) {
    deque<Foo> d = {
        Foo(1),
        Foo(2),
        Foo(3),
    };

    d.push_front(Foo(0));
    d.push_front(Foo(-1));
    d.push_front(Foo(-2));

    deque<Foo>::iterator begin = d.begin();
    deque<Foo>::iterator end = d.end();

    for (deque<Foo>::iterator it = begin; it != end; ++it) {
        std::cout << *it << std::endl;
    }

    std::cout << "reset1" << std::endl;

    for_each(begin, end, callback);

    std::cout << "reset2" << std::endl;
    while (begin != end) {
        std::cout << *begin << std::endl;
        begin++;
    }

    return 0;
}
2
3
4
5
6
7
8
9
10
11
12
13
14
15
16
17
18
19
20
21
22
23
24
25
26
27
28
29
30
31
32
33
34
35
36
37
38
39
40
41
42
43
44
45
46
47
48
49
50
51
52
53
54
运行结果
-2
-1
0
1
2
3
reset1
-2
-1
0
1
2
3
reset2
-2
-1
0
1
2
3
2
3
4
5
6
7
8
9
10
11
12
13
14
15
16
17
18
19
20
# set(集合)
# 多线程(C++11)
C++ 11 起增加了 std::thread 用于启动线程,下面是一个简单的启动和等待线程的例子。
- 使用 join() 等待线程结束
- 使用 joinable() 判断是否可以 join()
- std::thread 可以是任何普通函数(包括 lamda),但不能是类成员函数,因为类成员隐式传递了一个 this 参数。
#include <iomanip>
#include <iostream>
#include <thread>

std::string now_time_str() {
    time_t time = std::chrono::system_clock::to_time_t(std::chrono::system_clock::now());
    std::tm* now_tm = std::localtime(&time);

    std::ostringstream oss;
    oss << std::put_time(now_tm, "%H:%M:%S");
    return oss.str();
}

void worker() {
    std::cout << now_time_str() << " run in thread " << std::this_thread::get_id() << std::endl;
    std::this_thread::sleep_for(std::chrono::seconds(3));
    std::cout << now_time_str() << " endrun in thread " << std::this_thread::get_id() << std::endl;
}

int main(int argc, char* argv[]) {
    std::cout << now_time_str() << " start in thread " << std::this_thread::get_id() << std::endl;

    if (std::thread t(worker); t.joinable()) {
        std::cout << now_time_str()
            << " wait thread " << t.get_id()
            << " in thread " << std::this_thread::get_id()
            << std::endl;
        t.join();
    }

    std::cout << now_time_str() << " exit in thread " << std::this_thread::get_id() << std::endl;
    return 0;
}
2
3
4
5
6
7
8
9
10
11
12
13
14
15
16
17
18
19
20
21
22
23
24
25
26
27
28
29
30
31
32
33
运行结果
14:31:11 start in thread 0x204ecfac0
14:31:11 wait thread 0x16fb47000 in thread 0x204ecfac0
14:31:11 run in thread 0x16fb47000
14:31:14 endrun in thread 0x16fb47000
14:31:14 exit in thread 0x204ecfac0
2
3
4
5
# 并发支持
与 go 中的 Mutex 一样,C++ 也有内置的并发支持库。
# mutex
用法与 sync.Mutex 基本一致
#include <iomanip>
#include <iostream>
#include <thread>
#include <format>

int num = 0;
std::mutex mtx;

std::string now_time_str() {
    time_t time = std::chrono::system_clock::to_time_t(std::chrono::system_clock::now());
    std::tm* now_tm = std::localtime(&time);

    std::ostringstream oss;
    oss << std::put_time(now_tm, "%H:%M:%S");
    return oss.str();
}

void worker() {
    {
        std::ostringstream oss;
        oss << now_time_str() << " wait lock in thread " << std::this_thread::get_id();
        std::cout << oss.str() << std::endl;
    }

    mtx.lock();

    {
        std::ostringstream oss;
        oss << now_time_str() << " run lock in thread " << std::this_thread::get_id();
        std::cout << oss.str() << std::endl;
    }

    for (int i = 0; i < 3; ++i) {
        num++;
        std::this_thread::sleep_for(std::chrono::seconds(1));
    }

    mtx.unlock();
}

int main(int argc, char* argv[]) {
    std::thread t(worker);
    std::thread t2(worker);

    t.join();
    t2.join();

    std::cout << "num value " << num << std::endl;
    return 0;
}
2
3
4
5
6
7
8
9
10
11
12
13
14
15
16
17
18
19
20
21
22
23
24
25
26
27
28
29
30
31
32
33
34
35
36
37
38
39
40
41
42
43
44
45
46
47
48
49
50
运行结果
14:59:09 wait lock in thread 0x16f253000
14:59:09 wait lock in thread 0x16f2df000
14:59:09 run lock in thread 0x16f253000
14:59:12 run lock in thread 0x16f2df000
num value 6
2
3
4
5
# lock_guard
符合 RAII 的 mutex 包装器,离开作用域自动释放锁,不再需要手动维护锁状态。
#include <iomanip>
#include <iostream>
#include <thread>

int num = 0;
std::mutex mtx;

void worker() {
    std::lock_guard l(mtx);

    for (int i = 0; i < 3; ++i) {
        num++;
        std::this_thread::sleep_for(std::chrono::seconds(1));
    }
}

int main(int argc, char* argv[]) {
    std::thread t(worker);
    std::thread t2(worker);

    t.join();
    t2.join();

    std::cout << "num value " << num << std::endl;
    return 0;
}
2
3
4
5
6
7
8
9
10
11
12
13
14
15
16
17
18
19
20
21
22
23
24
25
26
运行结果
num value 6
# unique_lock
std::unique_lock 解决了 std::lock_guard 锁粒度大且不支持手动释放的问题。增加了 .lock(), .unlock() 方法支持在中途释放和重复加锁。并且仍然支持 RAII,在离开作用域时再判断锁状态,决定是否需要释放。
#include <iostream>
#include <thread>

std::mutex mtx;

int main(int argc, char* argv[]) {
    {
        std::unique_lock l(mtx);
        std::cout << "获取到锁" << std::endl;

        l.unlock();
    }

    {
        std::unique_lock l(mtx);

        std::cout << "获取到锁" << std::endl;
        l.unlock();
        l.lock();
    }

    {
        std::unique_lock l(mtx);
        std::cout << "获取到锁" << std::endl;
    }

    std::cout << "程序退出" << std::endl;
    return 0;
}
2
3
4
5
6
7
8
9
10
11
12
13
14
15
16
17
18
19
20
21
22
23
24
25
26
27
28
29
运行结果
获取到锁
获取到锁
获取到锁
程序退出
2
3
4
# condition_variable
条件变量,用于阻塞一个线程或同时阻塞多个线程,直至另一线程修改共享变量(条件)并调用 .notify_one() 或 .notify_all() 通知。如果调用 .notify_one() 通知只会有一个处于 wait 的线程收到通知。.notify_all() 则是全部 wait 线程都会收到通知。
虚假释放:condition_variable 在 .wait() 时需要提供一个 bool 变量,如果收到通知但是该变量的值仍然是 false 则继续等待。
#include <iostream>
#include <thread>

std::mutex mtx;
std::condition_variable cv;

void worker(bool& flag) {
    std::unique_lock l(mtx);

    cv.wait(l, [&flag] {
        if (!flag) {
            std::cout << std::this_thread::get_id() << " 被虚假唤醒,继续等待" << std::endl;
        }
        return flag;
    });

    std::cout << std::this_thread::get_id() << " 线程被唤醒" << std::endl;
    std::this_thread::sleep_for(std::chrono::seconds(1));
}

int main(int argc, char* argv[]) {
    // 先持有锁
    std::unique_lock l(mtx);
    bool flag;

    // clang-format off
    std::thread t1([&flag]() {worker(flag);});
    std::thread t2([&flag]() {worker(flag);});
    std::thread t3([&flag]() {worker(flag);});
    // clang-format on

    std::this_thread::sleep_for(std::chrono::seconds(3));
    std::cout << "主线程释放锁并通知全部线程" << std::endl;
    l.unlock();
    cv.notify_all();

    std::this_thread::sleep_for(std::chrono::seconds(3));
    std::cout << "主线程修改状态并通知一个线程" << std::endl;
    flag = true;
    cv.notify_one();

    std::this_thread::sleep_for(std::chrono::seconds(3));
    std::cout << "主线程修改状态通知其他全部线程" << std::endl;
    cv.notify_all();

    t1.join();
    t2.join();
    t3.join();
    return 0;
}
2
3
4
5
6
7
8
9
10
11
12
13
14
15
16
17
18
19
20
21
22
23
24
25
26
27
28
29
30
31
32
33
34
35
36
37
38
39
40
41
42
43
44
45
46
47
48
49
50
运行结果
主线程释放锁并通知全部线程
0x16f08f000 被虚假唤醒,继续等待
0x16f11b000 被虚假唤醒,继续等待
0x16f1a7000 被虚假唤醒,继续等待
主线程修改状态并通知一个线程
0x16f08f000 线程被唤醒
主线程修改状态通知其他全部线程
0x16f11b000 线程被唤醒
0x16f1a7000 线程被唤醒
2
3
4
5
6
7
8
9
# 惯用法
# C++ 与 lua 联合编程
# vcpkg
# 内存布局
内存有四个区域,使用 LLDB 调试一个简单程序以简单验证这些区域
程序
#include <iostream>
using namespace std;

int var_from_global = 1; // 全局变量在全局区

void stack_var() {
    string stack_var = "Hello"; // 局部变量在栈区
}

int main() {
    stack_var();

    string* heap_var = new string("Heap"); // 在堆区申请内存
    delete heap_var; // 释放堆区内存

    return 0;
}
2
3
4
5
6
7
8
9
10
11
12
13
14
15
16
17
编译时加入 -g 参数包含调试信息
g++ -g main.cpp -o main
# 使用 LLDB 调试
分别在代码的第9、16、18行设置断点,分别用于验证栈,堆,同时也避免程序运行完毕直接退出。
[15:41:30] playground $ lldb ./main
(lldb) target create "./main"
Current executable set to '/code/playground/main' (arm64).
(lldb) breakpoint set -l 9
Breakpoint 1: where = main`stack_var() + 36 at main.cpp:10:1, address = 0x0000000100003c2c
(lldb) breakpoint set -l 16
Breakpoint 2: where = main`main + 56 at main.cpp:16:12, address = 0x0000000100003ca8
(lldb) breakpoint set -l 18
Breakpoint 3: where = main`main + 108 at main.cpp:18:5, address = 0x0000000100003cdc
2
3
4
5
6
7
8
9
# 代码区
代码区由操作系统自动管理,无论程序是否运行,操作系统会自动加载程序代码到代码区。同时代码区有两个特点
- 共享的
简单理解即在一定规律下(操作系统有关)无论执行多少次同一份代码,在内存中使用的都是同一份。
- 只读的
即代码区的数据不能被任何程序修改,否则将会影响程序的正常运行(外挂的基本原理就是修改程序在代码区的某些值实现)
代码区无法直接查看,但可以通过 otool 分析Mach-O 文件来获取部分信息,同时也可以在 LLDB 中运行 memory region --all 查看内存布局。
# otool 和 LLDB 分析
通过 otool 分析 Mach-O 文件,-t 打印代码区并添加 -v 打印反汇编。 看不懂汇编不要紧,我们看到了 "Hello"、__main、"Heap" 等等我们自己代码里的内容即可大致验证。
[16:14:29] playground $ otool -t -v main
main:
(__TEXT,__text) section
__Z9stack_varv:
0000000100003c08	sub	sp, sp, #0x30
0000000100003c0c	stp	x29, x30, [sp, #0x20]
0000000100003c10	add	x29, sp, #0x20
0000000100003c14	add	x0, sp, #0x8
0000000100003c18	str	x0, [sp]
0000000100003c1c	adrp	x1, 0 ; 0x100003000
0000000100003c20	add	x1, x1, #0xf64 ; literal pool for: "Hello"
...
_main:
0000000100003c70	sub	sp, sp, #0x40
0000000100003c74	stp	x29, x30, [sp, #0x30]
0000000100003c78	add	x29, sp, #0x30
0000000100003c7c	stur	wzr, [x29, #-0x4]
0000000100003c80	bl	__Z9stack_varv
0000000100003c84	mov	x0, #0x18
0000000100003c88	bl	0x100003f14 ; symbol stub for: __Znwm
0000000100003c8c	str	x0, [sp, #0x8]
0000000100003c90	adrp	x1, 0 ; 0x100003000
0000000100003c94	add	x1, x1, #0xf6a ; literal pool for: "Heap"
...
2
3
4
5
6
7
8
9
10
11
12
13
14
15
16
17
18
19
20
21
22
23
24
其次可以通过 LLDB 读取内存布局时可以看到 [0x0000000100000000-0x0000000100004000) r-x __TEXT 的行,这表示了一个只读且可执行(r-x)的内存区域,并且分区是 __TEXT。
Mach-O 文件结构中 __TEXT 包含 Mach 头、被执行代码、只读常量等,权限给只读可执行(r-x)。
(lldb) memory region --all
[0x0000000000000000-0x0000000100000000) ---
[0x0000000100000000-0x0000000100004000) r-x __TEXT
Modified memory (dirty) page list provided, 1 entries.
Dirty pages: 0x100000000.
.....
2
3
4
5
6
# 全局区
存储全局变量和静态变量、常量(在全局区中单独叫做常量区)等,由系统在程序结束时释放。
# otool 和 LLDB 分析
依旧可以通过 otool 查看,我们确实也只有一个全局变量
[16:15:06] playground $ otool -d main
main:
(__DATA,__data) section
0000000100008000	00000001
2
3
4
LLDB 中可以使用 target variable 查看全局区变量,甚至直接查看到了变量名 var_from_global
 target variable
Global variables for /code/playground/main.cpp in /code/playground/main:
(int) ::var_from_global = 1
2
3
# 栈区
栈区由运行时管理分配与释放,主要是各种局部变量。
# LLDB 调试
栈区无法通过 LLDB 直接分析,但可以通过栈区的特性来构造代码进行过分析。使用 run 指令运行程序并开始调试,因为我们在第9行打了断点所以代码会暂停在此处,为什么是第10行而不是第九可能和 return 有关。
(lldb) run
Process 16197 launched: '/code/playground/main' (arm64)
Process 16197 stopped
* thread #1, queue = 'com.apple.main-thread', stop reason = breakpoint 1.1
    frame #0: 0x0000000100003c2c main`stack_var() at main.cpp:10:1
   7   	void stack_var() {
   8   	    string stack_var = "Hello"; // 局部变量在栈区
   9   	    return;
-> 10  	}
   11
   12  	int main() {
   13  	    stack_var();
Target 0: (main) stopped.
2
3
4
5
6
7
8
9
10
11
12
13
通过 frame variable 显示当前栈帧中变量的值
(lldb) frame variable
(std::string) stack_var = "Hello"
(lldb) frame variable stack_var
(std::string) stack_var = "Hello"
(lldb) frame variable &stack_var
(std::string *) &stack_var = "Hello"
2
3
4
5
6
可以看到确实是是我们设置的局部变量,通过 expression 查看变量的指针。$0 就是该变量的指针代号。
(lldb) expression &stack_var
(std::string *) $0 = "Hello"
2
通过 memory read 读取该变量的内存地址,看到内存是字符串 Hello ,同时也看到了变量的内存地址为 0x16fdfefc8
(lldb) memory read --size 10 --count 1 --format s $0
0x16fdfefc8: "Hello"
2
执行 continue 让程序继续执行至下一个断点即16行。依据栈变量的特性,我们一旦离开变量作用域,所占用的内存就会立刻被运行时释放(没有像前面野指针一节提到的保留一次是因为没有返回,局部变量不能作为表达式左值所以无需保留)。
(lldb) continue
Process 16197 resuming
Process 16197 stopped
* thread #1, queue = 'com.apple.main-thread', stop reason = breakpoint 2.1
    frame #0: 0x0000000100003ca8 main`main at main.cpp:16:12
   13  	    stack_var();
   14
   15  	    string* heap_var = new string("Heap"); // 在堆区申请内存
-> 16  	    delete heap_var; // 释放堆区内存
   17
   18  	    return 0;
   19  	}
Target 0: (main) stopped.
2
3
4
5
6
7
8
9
10
11
12
13
使用原来的命令再读取一次该地址,内容变成了乱码,可见内存已经被运行时释放了。
(lldb) memory read --size 10 --count 1 --format s $0
0x16fdfefc8: "\xffffffc0@\xfffffff8\x01"
2
# 堆区
堆区由程序管理分配与释放,但占用的内存也会随着程序退出,全部释放。C++ 中通过 new 关键字申请内存并得到指针,delete 关键字释放。释放后,该指针会立即成为野指针
#include <iostream>

int* foo() {
    int* a = new int(100);
    return a;
}

int main() {
    int* p = foo();

    std::cout << *p << " " << p << std::endl;
    std::cout << *p << " " << p << std::endl;
    std::cout << *p << " " << p << std::endl;

    delete p;

    std::cout << *p << " " << p << std::endl; // 野指针

    return 0;
}
2
3
4
5
6
7
8
9
10
11
12
13
14
15
16
17
18
19
20
执行结果
100 0x6000009d0030
100 0x6000009d0030
100 0x6000009d0030
-1429012432 0x6000009d0030
2
3
4
# LLDB 调试
断点已经运行在堆区申请之后了,我们如法炮制运行 frame variable 读取变量的内容和获取地址
(lldb) frame variable
(std::string *) heap_var = "Heap"
(lldb) frame variable heap_var
(std::string *) heap_var = "Heap"
(lldb) frame variable *heap_var
(std::string) *heap_var = "Heap"
(lldb) expression heap_var
(std::string *) $2 = "Heap"
2
3
4
5
6
7
8
读取该地址,可见确实是我们设置的变量值。按照堆区的特性,程序结束前系统都不会自动释放 heap_var 这个变量占用的内存,所以只要不主动释放,此指针的内容会一直是该字符串。
(lldb) memory read --size 10 --count 1 --format s $2
0x600001f840c0: "Heap"
2
继续执行代码来到 18 行,可以肯定此时 heap_var 所用的内存已经被 16 行的 delete 释放了。
(lldb) continue
Process 16197 resuming
Process 16197 stopped
* thread #1, queue = 'com.apple.main-thread', stop reason = breakpoint 3.1
    frame #0: 0x0000000100003cdc main`main at main.cpp:18:5
   15  	    string* heap_var = new string("Heap"); // 在堆区申请内存
   16  	    delete heap_var; // 释放堆区内存
   17
-> 18  	    return 0;
   19  	}
Target 0: (main) stopped.
2
3
4
5
6
7
8
9
10
11
我们使用 memory read 再次读取该指针,可以发现已经成了乱码,证明指针被我们主动释放。
(lldb) memory read --size 10 --count 1 --format s $2
0x600001f840c0: "\xffffffc0@J*\x14\x7f"
2
继续执行程序,并退出调试。
(lldb) continue
Process 16197 resuming
Process 16197 exited with status = 0 (0x00000000)
(lldb) exit
2
3
4
# 综合案例
# 水仙花数
#include <iostream>
using namespace std;

int main(const int argc, char* argv[]) {
    for (int i = 100; i <= 1000; i++) {
        const int a = i % 10; // 个位
        const int b = i / 10 % 10; // 十位
        const int c = i / 100; // 百位

        if (a * a * a + b * b * b + c * c * c == i) {
            cout << "水仙花数: " << i << endl;
        }
    }
}
2
3
4
5
6
7
8
9
10
11
12
13
14
执行输出
水仙花数: 153
水仙花数: 370
水仙花数: 371
水仙花数: 407
水仙花数: 1000
2
3
4
5
# 猜数字游戏
#include <iostream>

int main(const int argc, char* argv[]) {
    int input = 0;
    int num = rand() % 100;
    std::cout << "开始猜数字游戏!" << std::endl << std::endl;

    while (true) {
        std::cout << "请输入数字:";
        std::cin >> input;

        if (input > num) {
            std::cout << "输入过大." << std::endl;
            continue;
        } else if (input < num) {
            std::cout << "输入过小." << std::endl;
            continue;
        }

        std::cout << "🎉恭喜你答对了!" << std::endl;

        break;
    }

    return 0;
}
2
3
4
5
6
7
8
9
10
11
12
13
14
15
16
17
18
19
20
21
22
23
24
25
26
执行输出
开始猜数字游戏!

请输入数字:50
输入过大.
请输入数字:25
输入过大.
请输入数字:12
输入过大.
请输入数字:6
输入过小.
请输入数字:8
输入过大.
请输入数字:7
🎉恭喜你答对了!
2
3
4
5
6
7
8
9
10
11
12
13
14
# 冒泡排序
- 对数组进行数组长度 -1 轮循环,每一轮进行数组长度 -循环轮次 -1 次子循环
- 每次子循环都将数字与其下一位进行比较并交换,最终得到当前轮的最大值
- 不断的循环,每次循环都得到从数字 [0:子循环次数] 中的最大值
如下是数组: [5, 4, 3, 2, 1] 中最大值不断冒泡的过程
- [4, 3, 2, 1, 5]
- [5, 4, 3, 2, 1]
- [4, 5, 3, 2, 1]
- [4, 3, 5, 2, 1]
- [4, 3, 2, 5, 1]
- [4, 3, 2, 1, 5]
- [3, 2, 1, 4]
- [2, 1, 3]
- [1, 2]
#include <iostream>
void array_dump(std::string prefix, int arr[], const int len) {
std::cout << prefix;
for (int i = 0; i < len; ++i) {
std::cout << arr[i] << " ";
}
}
void array_sort(int arr[], const int len) {
for (int i = 0; i < len - 1; i++) {
std::cout << "round " << i << " num " << len - i - 1;
std::cout << std::endl;
for (int j = 0; j < len - i - 1; j++) {
std::cout << "\t" << "." << j;
array_dump(" before: ", arr, len);
std::cout << "arr[" << j << "] " << arr[j] << " arr[" << j + 1 << "] " << arr[j + 1];
if (arr[j] > arr[j + 1]) {
std::cout << " exchange: " << arr[j] << "," << arr[j + 1] << " ";
// 交换 j 和 j+1
int temp = arr[j];
arr[j] = arr[j + 1];
arr[j + 1] = temp;
} else {
std::cout << "exchange: ";
}
array_dump("after: ", arr, len);
std::cout << std::endl;
}
}
}
int main(const int argc, char* argv[]) {
int arr[] = {5, 4, 3, 2, 1};
size_t len = std::size(arr);
array_dump("origin: ", arr, len);
std::cout << std::endl;
array_sort(arr, len);
array_dump("result: ", arr, len);
}
2
3
4
5
6
7
8
9
10
11
12
13
14
15
16
17
18
19
20
21
22
23
24
25
26
27
28
29
30
31
32
33
34
35
36
37
38
39
40
41
42
43
44
45
46
执行输出
origin: 5 4 3 2 1
round 0 num 4
.0 before: 5 4 3 2 1 arr[0] 5 arr[1] 4 exchange: 5,4 after: 4 5 3 2 1
.1 before: 4 5 3 2 1 arr[1] 5 arr[2] 3 exchange: 5,3 after: 4 3 5 2 1
.2 before: 4 3 5 2 1 arr[2] 5 arr[3] 2 exchange: 5,2 after: 4 3 2 5 1
.3 before: 4 3 2 5 1 arr[3] 5 arr[4] 1 exchange: 5,1 after: 4 3 2 1 5
round 1 num 3
.0 before: 4 3 2 1 5 arr[0] 4 arr[1] 3 exchange: 4,3 after: 3 4 2 1 5
.1 before: 3 4 2 1 5 arr[1] 4 arr[2] 2 exchange: 4,2 after: 3 2 4 1 5
.2 before: 3 2 4 1 5 arr[2] 4 arr[3] 1 exchange: 4,1 after: 3 2 1 4 5
round 2 num 2
.0 before: 3 2 1 4 5 arr[0] 3 arr[1] 2 exchange: 3,2 after: 2 3 1 4 5
.1 before: 2 3 1 4 5 arr[1] 3 arr[2] 1 exchange: 3,1 after: 2 1 3 4 5
round 3 num 1
.0 before: 2 1 3 4 5 arr[0] 2 arr[1] 1 exchange: 2,1 after: 1 2 3 4 5
result: 1 2 3 4 5
2
3
4
5
6
7
8
9
10
11
12
13
14
15
16